Editing in Photoshop: Cropping & Levels

Today we will continue editing our photos. First and foremost, remember that not all photos need editing.
If a photo looks great, leave it alone!

Today you should create two blog posts:
  • before and after images of any photos you edited today
  • a post with your 15 favorite (edited if necessary) photos. I will review these and offer feedback on which 10 you should submit as your final collection in order to receive the highest possible grade.

Straightening a crooked image

In general, try to hold your camera straight, and when possible, steady it by leaning it on a sturdy surface. If you have accidentally taken a crooked photo however, you can straighten it in Photoshop. Here are some examples: Photo credit: Betty Photo credit: Lizzy

How to Straighten a Crooked Image in Photoshop

  1. In your layers palette on the lower right side of the screen, double click the background layer. Rename it.
  2. View -> Rulers view_rulers
  3. Rulers will show up on the top and left side of the screen. Click anywhere in the ruler area and drag toward the photo to create a guide. guide_Adding_instructions
  4. Adjust the guide so it is next to an object with a straight edge that is currently slanted. You will use this guide as your reference. (In the example below, I have added a vertical guide to compare to the street light, and a horizontal guide to compare to the horizon line.) Screen Shot 2015-05-06 at 3.26.01 PM
  5. Edit -> Transform -> Rotate
  6. Rotate the image until the edge of your object is parallel to your guide. Then press the “enter” key. Screen Shot 2015-05-06 at 3.26.48 PM
  7. Select the crop tool from the tools palette on the left side of the screen. crop_tool
  8. Drag your crop tool to select the area you want to keep. Press the “enter” key once you have successfully evened out the edges of your image. Screen Shot 2015-05-06 at 3.27.11 PM

Cropping Distracting Objects Out of an Image

You can also use the crop tool to cut out distracting objects in the background and make the focal point stand out more. Notice how much stronger the image on the right is, because I have focused the attention on Robert by cropping out the distracting elements around him: IMG_2444_bw IMG_2444edited Important Note #1: Whenever you edit an image, save a version of the image with a new name by going to the top of the screen and selecting File -> Save As, and naming it something that makes sense. For example, if the original image was named “Flower123,” and you cropped the image, name the edited version “Flower123_cropped.” Important Note #2: Not every image needs to be cropped! If an image looks great already, leave it alone.

How to Increase Contrast by Adjusting Levels

  1. Image -> Adjustments -> Levels
  2. Look at the image that pops up. If your image has sufficient contrast, the “mountain range” will extend to the edge of the window. If your image looks similar to this, you do not need to adjust the levels, and can close out of the window: levels_no_adjustment

    If your “mountain range” of values does not extend to the edges of the window (such as the example below), you will click on the left cursor and drag it to the beginning of the left side of the mountain. You will then click on the right cursor and drag it to the beginning of the right side of the mountain. You will be able to preview what you are doing as long as the “preview” box is checked. levels_before_and_after When you have adjusted your levels, click ok.

Today we will:

  • Continue editing our favorite photos.
  • Create a new blog post with before and after images of any photos we edited today. Michele’s blog post has a great example of how to show before and after images side by side.
  • If time allows: Create a second blog post with your 15 favorite (edited if necessary) photos.

Last Day to Take Angle of View Photos

Today’s essential question: What are some things you cannot fix in Photoshop? How can you prevent these issues?

Some possible answers include:
  • blurry photos – hold the camera still and photograph a still subject
  • too much contrast – never point a camera towards a light source; instead, shoot with the sun at your back
  • awkward objects in the background – move around your subject and change the angle of the camera until the background and the subject work in harmony with one another

Today will be our last day to take photos for the Angle of View photography assignment. Next class, we will finish editing our photos, and post a collection of our ten best, edited photos. This collection is what will be graded. Next week, we will start a second photography assignment.

Here are some of my favorite photos submitted for this assignment so far:

Photo Credit: Alyssa

Photo Credit: Alyssa

Photo Credit: Yoshua

Photo Credit: Yoshua

Photo Credit: Brian

Photo Credit: Brian

Photo Credit: Bayleigh

Photo Credit: Bayleigh

Photo Credit: Robert

Photo Credit: Robert

Today we will:

  • take photos from the following angles of view: bird’s eye view, worm’s eye view, eye level view
  • create a new blog post with the best photos we took today

Special Announcement

teachers_challenge5kInterested in running or walking a 5K (3.1 miles) to benefit SOTA?
Sign up for the Teacher’s Challenge 5K as part of the SOTA team.
The race takes place on Sunday, June 14th at 8:30 am at Ellison Park.

Ms. Lawson will be running it and challenges you to try to beat her.
Sign up here.

Editing in Photoshop: Cropping & Levels

Today’s essential questions: How can cropping into an image improve a photo? When should I not crop an image?

Today we will review some techniques for editing photos. First and foremost, remember that not all photos need editing. If a photo looks great, leave it alone!

Straightening a crooked image

In general, try to hold your camera straight, and when possible, steady it by leaning it on a sturdy surface. If you have accidentally taken a crooked photo however, you can straighten it in Photoshop. Here are some examples:

Photo credit: Betty

Photo credit: Lizzy

How to Straighten a Crooked Image in Photoshop

  1. In your layers palette on the lower right side of the screen, double click the background layer. Rename it.
  2. View -> Rulers
    view_rulers
  3. Rulers will show up on the top and left side of the screen.
    Click anywhere in the ruler area and drag toward the photo to create a guide.
    guide_Adding_instructions
  4. Adjust the guide so it is next to an object with a straight edge that is currently slanted. You will use this guide as your reference. (In the example below, I have added a vertical guide to compare to the street light, and a horizontal guide to compare to the horizon line.)
    Screen Shot 2015-05-06 at 3.26.01 PM
  5. Edit -> Transform -> Rotate
  6. Rotate the image until the edge of your object is parallel to your guide.
    Then press the “enter” key.
    Screen Shot 2015-05-06 at 3.26.48 PM
  7. Select the crop tool from the tools palette on the left side of the screen. crop_tool
  8. Drag your crop tool to select the area you want to keep.
    Press the “enter” key once you have successfully evened out the edges of your image.
    Screen Shot 2015-05-06 at 3.27.11 PM

Cropping Distracting Objects Out of an Image

You can also use the crop tool to cut out distracting objects in the background and make the focal point stand out more. Notice how much stronger the image on the right is, because I have focused the attention on Robert by cropping out the distracting elements around him:
IMG_2444_bw IMG_2444edited

Important Note #1: Whenever you edit an image, save a version of the image with a new name by going to the top of the screen and selecting File -> Save As, and naming it something that makes sense. For example, if the original image was named “Flower123,” and you cropped the image, name the edited version “Flower123_cropped.”

Important Note #2: Not every image needs to be cropped! If an image looks great already, leave it alone.

How to Increase Contrast by Adjusting Levels

  1. Image -> Adjustments -> Levels
  2. Look at the image that pops up. If your image has sufficient contrast, the “mountain range” will extend to the edge of the window.
    If your image looks similar to this, you do not need to adjust the levels, and can close out of the window:

    levels_no_adjustment

    If your “mountain range” of values does not extend to the edges of the window (such as the example below), you will click on the left cursor and drag it to the beginning of the left side of the mountain.
    You will then click on the right cursor and drag it to the beginning of the right side of the mountain.
    You will be able to preview what you are doing as long as the “preview” box is checked.

    levels_before_and_after

    When you have adjusted your levels, click ok.

Today we will:

  • Use the crop tool in Photoshop to straighten and improve the composition of some of our photos.
  • Adjust levels when we need to increase contrast in a photo.
  • Create a new blog post with before and after images of any photos we have edited. Michele’s blog post has a great example of how to show before and after images side by side.

Taking Photos at Eye Level View

Today’s essential question: How can bringing yourself to the same eye level as your subject improve your photo?

Here are some of my favorite photos taken by 10th grade students during the last class. What makes each photo great?

Photo Credit: Marina

Photo Credit: Marina

Photo Credit: Marina

Photo Credit: Marina

Photo Credit: Jordy

Photo Credit: Jordy

Photo Credit: Jordy

Photo Credit: Jordy

Photo Credit: Alyssa

Photo Credit: Alyssa

Hopefully, Alyssa’s photo helps explain how Jordy got those great camera angles in his photos. A great photo often requires bringing yourself to the same level as the subject you are photographing.

Today we will:

  • Take photos outside, continuing to experiment with different camera angles. Try to take photos of the same subject from different camera angles!
  • Create a new new blog post with the best photos we took today.

Photo Day #3: Avoiding Common Photography Mistakes

Today’s essential question: What are some things that can ruin a photo and how can I avoid them?

1. Lack Of A Distinct Subject or Focal Point
Snapshot

It is important to have a clear subject in your photo, as no amount of editing can turn a bad photo into a good
one. A photo subject is anything that stands out in the photo, that makes it interesting and that the human eye
will see first.

Your subject could be a person, a building, a tree or a mountain, but you have to have something that stands
out, that the eye will see first. If nothing stands out, the photo is empty, and there is no point in taking it. It’s a
common rookie mistake to take a photo of a sunset that has just the sky and the sea. Even if the sunset is really
amazing, that photo won’t look good unless there’s a good subject in it.

2. Awkward Objects in the Background
david

The easiest way to improve your photography is to improve the composition of your photos. Pay attention to how the different elements in your photo interact with one another. For example, if the tree in the background looks like it is growing out of your subject’s head, you can walk around the subject slightly so the tree is no longer directly behind them.

3. Using Flash
flash-ruins-photos-cropped

The flash will often ruin your low-light photos by adding a flat, ugly glare to the central parts of the image while at
the same time making colors cold and unnatural. The only time you should a flash is in complete darkness when
nothing is seen without the flash, and you should only use it for subjects within one meter from the camera.

4. Blurry Photos
robert_blurry_cropped

Images come out blurry for a few reasons when there is not enough light reaching the sensor or when the subject is moving too quickly. Solutions include adding adequate light, stabilizing the camera, or asking your subject to hold still for a moment.

Today we will:

  • Take photos outside, avoiding the mistakes listed above
  • Publish a new blog post that contains the best photos we took today

Photo Day 2: Taking Photographs with a Clear Subject

Today’s essential question: Why is it important to take photographs with a clear subject or focal point?

Here are some great photos taken during last class. What makes each of these photos “good”?

Jakees

Jakees

Ler

Ler

Marina

Marina

Alyssa

Alyssa

Deandrey

Deandrey

Bayleigh

Bayleigh

Ms. Lawson

Ms. Lawson

Here are some examples of bad photos with no clear subject. Notice how it is difficult to tell what the photo is about:

ishmeal_texture Jackson_D_shape1

Think about the photos you have taken. What might you do differently today to ensure that every photograph you take has a clear subject?

Today we will:

  • Take photos in the courtyard
    • we will make sure each photo has a clear subject
    • we will continue to take photos from different points of view (bird’s eye view, worm’s eye view, eye level view)
  • Transfer the photos onto a computer, and create a new blog post with the best photos we took today

Photo Assignment #1: Angle of View

Today’s essential question: How can pointing a camera up, down, or straight ahead change the overall mood of the photograph?

For our first photography assignment, you will focus on taking interesting photographs from different camera angles. You will also keep in mind the rule of thirds.

Rule of Thirds

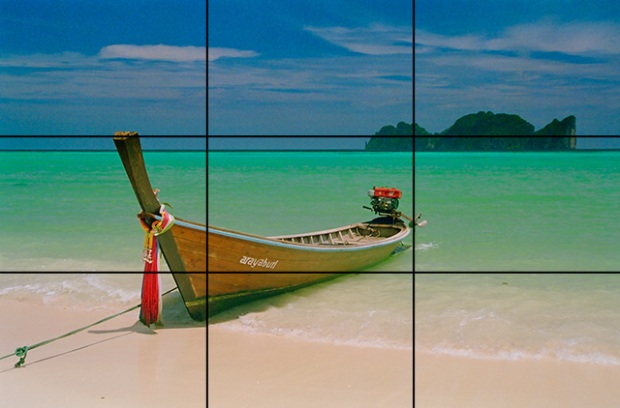
To apply the rule of thirds to your photograph, break an image down into thirds (both horizontally and vertically) so that you have 9 parts. Place points of interest in the intersections or along the lines to create a more balanced and visually interesting photo. Studies have shown that people’s eyes usually go to one of the intersection points rather than the center of the shot. When we use the rule of thirds, we make the way people naturally view images work for us rather than against us. kohphiphi-15 4286577129_2ecc78308d_z_1   rule-photography2

Angle of View

Eye Level An eyelevel angle is the one in which the camera is placed at the subject’s height. Eyelevel shots are incredibly common because they are neutral. They often have no dramatic power whatsoever. cat_eye_level   eye-level-great-white_shark High Angle In a high angle (bird’s eye view), the camera is above the subject, looking down. High angle shots can make the subject seem vulnerable or powerless, and are usually used to make the image more dramatic. high angle view of a young man dunking a basketball   high_angle_dog Low Angle Low angles (worm’s eye view) are captured from a camera placed below the subject, looking up at them. Low angles make the subject look dominant, aggressive, or ominous. dave-hill-dynamic-angles   ??????????????????????????????????????????????????????????????????????

Project Requirements

Daily – At the end of each class, you will:

  • Copy any photos you have taken that day onto your username and a back up (google drive account, flash drive, etc)
  • Delete photos off the memory card
  • Create a new blog post with the following:
    • Post your best photos unedited from that day.
    • Write a few sentences describing what you like about each photo, and what you can improve by later editing the photo.

Final – At the end of the unit, you will create a new blog post with the following:

  • Your 10 best photos from that shooting assignment. You will post the original photo next to the edited photo to allow for side-by-side comparison.
  • You will write a short paragraph describing the changes you made editing the photo.

You will be graded on:

  • Documentation of daily progress via daily blog posts.
  • Quality of 10 final photos.
  • How well the 10 final photos show your understanding of different camera angles and composition.
  • Technical editing; your edited photos should look better than your originals.
  • Improvement and reflection; your photos should be getting better with practice and reflection. This should be clear in your daily blog posts.

Reminder of Class Back Up Policy:

It is your responsibility to save your photos to at least two different locations. I will provide ample class time to take enough photos to do well on this project. If you fail to back up your photos and lose  your work, you will still be required to turn in ten photos by the deadline, and will be graded on these photos.

Today we will:

introduce the Angle of View photo project

  • learn how to use the cameras
  • take photos outside from the following points of view: bird’s eye view, worm’s eye view, eye level view
  • transfer the photos onto our computer and clear the memory card
  • upload the best photos from today to our blog