Photo Assignment #7: Macro Photography

Macro photography is extreme close-up photography, usually of very small subjects, in which the size of the subject in the photograph is greater than life size.

Here are some examples of macro photographs:

Here are some macro photos taken by past SOTA students:

Today we will:

  • take macro photos outside
  • create a new blog post with the following:
    • the best photos taken during today’s class
    • a few sentences describing what was easy about macro photography and what you found challenging

Creating Vector Art with the Pen Tool

Today’s essential question: How can I use the pen tool to create vector imagery in Adobe Illustrator?

Remember how scaling a raster image larger will pixelate the image (as in the example below)?
pixelated_escher_screen_shot

Today we will learn about a different type of image called a vector. Vector images can be scaled infinitely and will never get blurry. Logos are usually vector images so they can be printed on everything from buttons to billboards without becoming blurry.

Here are some examples of vector art:

air-jordan-logo-brand-1000x500   OVO OWL1-B-LOGO-JPG


Vector Practice Tutorial

Today we will begin tracing over our t-shirt design sketches in Adobe Illustrator.
We will view a demo at the Smart Board and then follow these steps:

Part 1: Setting Up the File
  1. Right-click to save the image below:
    vector_practice
  2. Open Adobe Illustrator.
  3. Select “New Print Document” from the pop up screen.
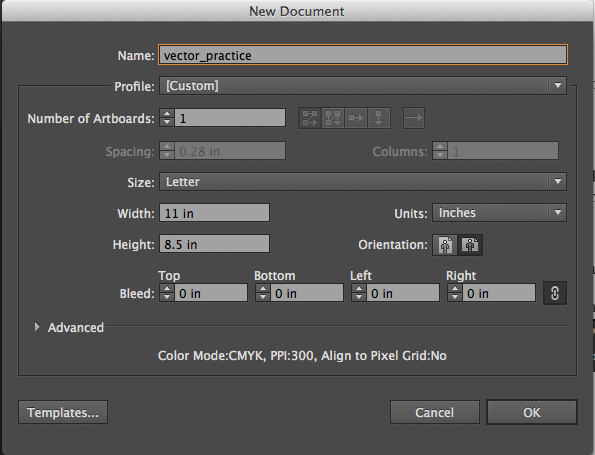
  4. Create a new file in Adobe Illustrator with the following guidelines:
    1_file_setup
  5. Place the image you just downloaded from this blog post. (File -> place)
    DO NOT try to open your downloaded image in Illustrator! This will cause strange things to happen.
Part 2: Using the Pen Tool to Draw Straight Lines
  1. Create a new layer by clicking on the “new layer” button at the bottom of the layers palette on the right side of the screen. new_layer_button
  2. Select the pen tool. pen_tool
  3. You can change the color by clicking on the square at the bottom of the toolbar on the left hand side of the screen: 2_color_change
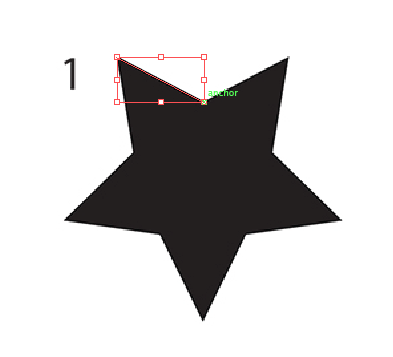
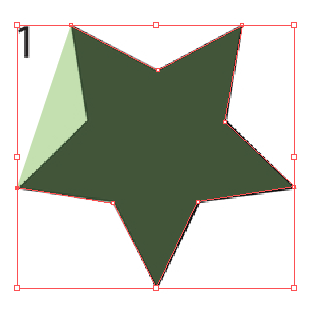
  4. Trace over your first shape (the star). Click once to add the first anchor point. Move your mouse to the next position and click again to create the second point. The two anchor points will be connected together.3_star1
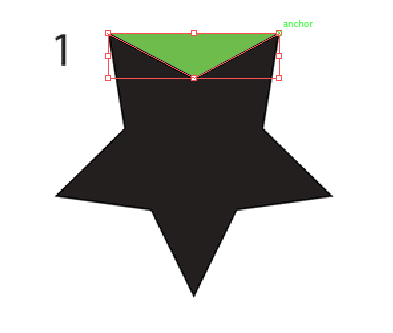
  5. Continue clicking points around the star IN ORDER until you reach the starting point.
    4_star2
    5_star3
    (You may need to decrease the opacity of the star you are drawing so you can see what you are tracing. You can do this by clicking on the transparency icon on the right side of the screen and decreasing the opacity so it is below 100. transparency_window)
    6_star4
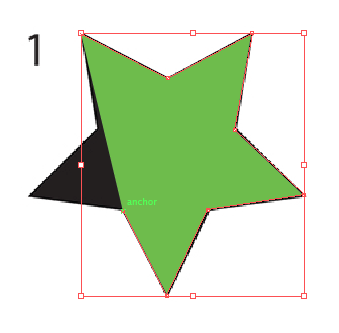
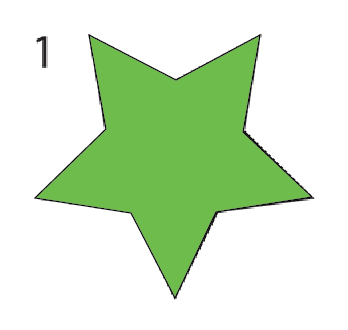
  6. Close the path by clicking on the starting point a second time. Bring the opacity back 100% and adjust the color if necessary.
    7_star5
Part 3: Using the Pen Tool to Draw Curves
  1. Click to create your first point.
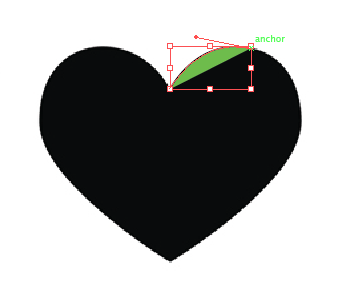
  2. Click where you would like your next point to be, but do not let go of the mouse until you have dragged the point to adjust the curve:
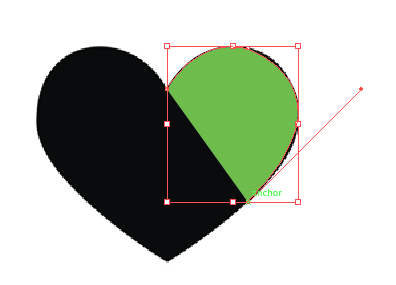
    heart1
  3. Click on the middle dot. This should make the second half of the tangent line, or handle, disappear:
    heart2
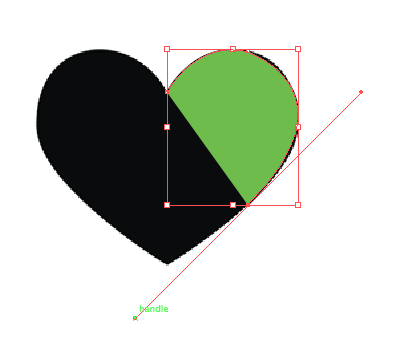
  4. Click where you would like your next point to be, but do not let go of the mouse until you have dragged the point to adjust the curve:
    heart3
  5. Once again, click on the middle dot. This should make the second half of the tangent line, or handle, disappear:
    heart4
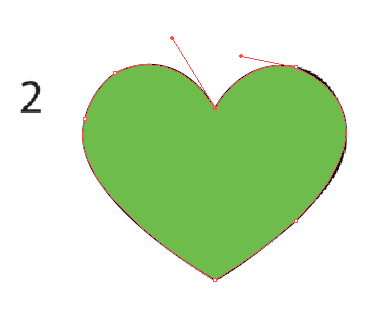
  6. Continue adding points around the heart in order. Close the path by clicking on the starting point a second time.
    heart5
  7. Follow the same steps to outline the apple.
  8. Follow the same steps to outline the dog.
Part 4: Saving your file and posting to the blog
  1. Save your file as a .pdf (File -> Save As -> PDF)
  2. Create a new blog post with the PDF of your progress.

Today we will:

  • Complete the pen tool mini lesson in Adobe Illustrator
  • Save our file as a PDF
  • Create a new blog post with the following:
    • the PDF file of our completed mini lesson
    • a few sentences describing any challenges you faced, how you worked through them, and how you feel about the pen tool


Photo Assignment #5: Rule of Thirds

Today’s essential question: How can I use the rule of thirds to take photos with a dynamic composition?

Today we will use the rule of thirds to improve the composition of our photos. You may take props with you if wish.

Rule of Thirds

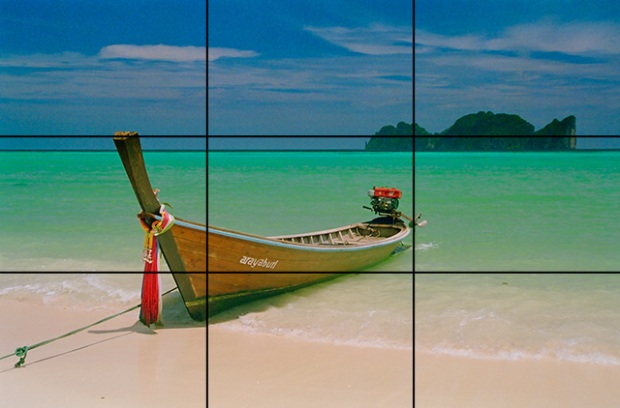
To apply the rule of thirds to your photograph, break an image down into thirds (both horizontally and vertically) so that you have 9 parts. Place points of interest in the intersections or along the lines to create a more balanced and visually interesting photo. Studies have shown that people’s eyes usually go to one of the intersection points rather than the center of the shot. When we use the rule of thirds, we make the way people naturally view images work for us rather than against us. kohphiphi-15 4286577129_2ecc78308d_z_1   rule-photography2

Avoid centering your focal point. See how the image below feels static and boring?

Placing your focal point a third of the way across the page will create a much more interesting image:

Notice how the artist has improved the photo by cropping it to follow the rule of thirds:

Today we will:

  • Take photos outside that follow the rule of thirds
  • Create a new blog post with the following:
    • the best 8-20 photos taken today
    • a few sentences describing how your photos follow the rule of thirds

Photo Mini Assignment #4: Photographing Line and Shape

Today’s essential question: How can I use the art elements line and shape to create interesting photographs?

Today we will take photos, trying to capture line, shape, and space in interesting ways. You must post your best photos from today to your blog AND write a reflection according to the instructions at the bottom of this blog post in order to receive participation points for the day.

Look for photo opportunities that already exist, but at the same time, be ready to stage photos if you get an idea that fits today’s assignment.

Line

Shape

Today we will:

  • Take interesting photos of line, shape, and space
  • Create a new blog post with the following:
    • The best photos we took today
    • Label each photo with the appropriate category (line or shape)
    • The answers to the following questions
      • What are some ways your photography skills have improved over the past few classes?
      • What are some things you still struggle with?

Photo Assignment #3: Photographing the Same Subject from Different Perspectives

The following students need to turn in their walking field trip permission slips: Jaden, Eliejha, Seth, Jamila, Aquan, Omarion

Today’s essential question: How can I take at least 10, different, interesting photos of the same subject?

Today we will pick one subject and spend all class photographing that same subject from a variety of viewpoints, and in a variety of locations. Think about what story you are telling with each photo. Try different camera angles, and check to make sure there are no awkward objects in your background. At the end of class, we will post the best 10 photos to our blogs.

Here are some examples taken by previous 10th grade students:

Victoria
Mariana
McKenzie

Today we will:

  • Pick a subject and photograph only that subject from a variety of viewpoints
  • Create a new blog post with the following
    • The best 10 photos taken today to our blogs
    • A few sentences describing how easy or challenging it was to stick to photographing the same subject all class

Photo Assignment #2: Angle of View

Folders have been updated. Check your folder to make sure you have been given credit for completing the “Bad Photos” assignment. No blog post = 0 for the day.

Angle of View

Today’s essential question: How can pointing a camera up, down, or straight ahead change the overall mood of the photograph?

Today we will take interesting photographs from different camera angles.

Eye Level

An eyelevel angle is the one in which the camera is placed at the subject’s height. Eye level shots are incredibly common because they are neutral. They often have no dramatic power whatsoever. cat_eye_level   eye-level-great-white_shark

High Angle

In a high angle (bird’s eye view), the camera is above the subject, looking down. High angle shots can make the subject seem vulnerable or powerless, and are usually used to make the image more dramatic. high angle view of a young man dunking a basketball   high_angle_dog

Low Angle

Low angles (worm’s eye view) are captured from a camera placed below the subject, looking up at them. Low angles make the subject look dominant, aggressive, or ominous. dave-hill-dynamic-angles   ??????????????????????????????????????????????????????????????????????

Today we will:

  • Take photos outside from the following points of view: bird’s eye view, worm’s eye view, eye level view
  • Transfer the photos onto our computer and clear the memory card
  • Create a new blog post with the following:
    • The best 3-5 photos for each category (birds eye view, worms eye view, eye level) This means you should have 9-15 photos total.
    • Photos should be grouped by category and labeled. No credit will be given for photos that are not labeled with the appropriate camera angle.

No blog post = 0 participation for the day

Photo Mini Assignment #1: Bad Photos

Today’s essential question: What are some common photography mistakes that should be avoided in order to achieve professional quality photos?

Today we will complete a 1 Day Assignment: Bad Photos. You will upload one photo in each of the following topics to your blog at the end of class, along with a brief write up as to why each photo is objectively terrible.

Blurry Photo
robert_blurry_cropped
Images come out blurry for a few reasons when there is not enough light reaching the sensor or when the subject is moving too quickly. Solutions include adding adequate light, stabilizing the camera, or asking your subject to hold still for a moment.

Crooked Photo
slantedpeoplesbacks
Beginner photographers often think that slanting the camera will make their photograph appear “artsy.” It will not. It will just make it look like you were falling sideways while you took the photo.

Poorly Exposed Photo
poorly-exposed-photo
We can lighten or darken a photo in Photoshop, but if the image has too much contrast to begin with (usually caused by shooting directly into the light source, instead of having the light source at your back), there is no way to fix the photo.

Photo Without Clear Subject Matter
photo_no_subject

It is important to have a clear subject in your photo, as no amount of editing can turn a bad photo into a good one. A photo subject is anything that stands out in the photo, that makes it interesting and that the human eye will see first.

Your subject could be a person, a building, a tree or a mountain, but you have to have something that stands out, that the eye will see first. If nothing stands out, the photo is empty, and there is no point in taking it. It’s a common rookie mistake to take a photo of a sunset that has just the sky and the sea. Even if the sunset is really amazing, that photo won’t look good unless there’s a good subject in it.

Photo with Poor Composition
poor_composition1
In the photo on the left, the subject is too centered and makes the image feel boring. There is too much space at the top of the photo, and not enough space below. Notice how much more interesting the photo on the right is by changing up the composition. The eyes of the subjects in the photo on the right follow the rule of thirds.

Cliché Photo
cliche_feet_vacation
A cliché photo is one that contains an overused concept and reflects a lack of original thought.  Cliché photos are all over Instagram and SnapChat.

Awkward Objects in Background
david_awkward_bg
Pay attention to how the different elements in your photo interact with one another. For example, if the tree in the background looks like it is growing out of your subject’s head, you can walk around the subject slightly so the tree is no longer directly behind them.

Today we will:

  • Learn how to use the cameras
  • Take objectively terrible photos so that we may learn how to avoid these bad habits in the future
  • Transfer the photos onto our computer and clear the memory card
  • Create a new blog post with the following:
    • One example of each of the following bad photo categories:
      • blurry photo
      • crooked photo
      • poorly exposed photo
      • photo without clear subject matter
      • photo with poor composition
      • cliché photo
      • photo with awkward objects in the background
    • A brief write up as to why each bad photo is objectively terrible

Remember, no blog post = 0 participation for the day.

First Blog Post: Day 3

grumpy_cat_teacherVery few people have correctly fulfilled all the requirements for the first blog post assignment (posted a unique image and answered the questions listed on my last blog post). Congratulations to Joniah, Brian, Jayden, Jamila, Viviam, and Rae’iona! You may use a class camera to take photos around the room, free draw, or decorate your folders.

We cannot start the photography unit until everyone has a working blog and is able to successfully make blog posts.

The following students need to email me (2013045@rcsd121.org) the link to their blog:
  • Danny
  • Omarion
  • Eric
  • Aquan
  • Seth
  • Eliejha
  • Jaden
  • Sylena
The first blog post must contain the following required elements:
  • An image that is meaningful to you (not the default picture that shows up on the wordpress blog!)
  • The answers to the following questions:
    • Describe your previous experience with computer art.
    • Whose is responsible if the computer crashes and your project disappears? What will happen?
    • How will you back up your work? (hint: blog, Google Drive)
    • Why is it important to make a blog post every day?
The following students need to create or edit their first blog post so it contains those elements:
  • Daniel
  • Omarion
  • Ameena (add unique image)
  • Avery (add unique image)
  • Eric
  • Ezequiel
  • Bikram
  • Kyneisha
  • Aquan
  • Seth
  • Eliejha
  • Jaden
  • Sylena
  • John (add unique image)

If everyone finishes before the end of 7th period, we can spend 8th period taking photos outside. Focus and help (rather than distract) each other!

Today we will:

  • Finish the first blog post assignment (and email Ms. Lawson the link to your blog if you have not already done so)
  • Take photos outside (depending on how quickly people finish the first blog post assignment)
  • Post the photos taken today to our class blogs

Day 2: Setting Up Our Class Blogs

Today we will finish setting up our class blogs. By the end of this class you should:

  • set up your class blog
  • email Ms. Lawson the link to your class blog from your school Gmail account
  • publish your first blog post that contains all the required elements described in this blog post


Part 1: Setting Up Our Class Blogs

Part 1A (If you do not have a WordPress account from Foundations 1): Setting up a WordPress account
  1. Click here to set up a WordPress account. (This will be your Foundations 2 class blog.) You may choose any free template you like, but keep in mind that you will need to post both text and images, so you should pick a template that supports both of these requirements well.Use your school Gmail address (890….@rcsd121.org) – you will have to verify your email in order to publish blog posts.
  2. Go to Part2 (logging into your district Gmail account).
Part 1B (If you have a WordPress account from Foundations 1): Creating a new blog within an existing WordPress account 
  1. Go to wordpress.com and log into your account. Your email address should be your student ID # @rcsd121.org.
  2. Click on “My Sites” at the top left side of the screen. 
  3. Scroll all the way to the bottom and select “WP Admin”
  4. Click on “My blogs”
  5. Click “Register another blog” at the bottom of the screen.
  6. Follow the prompts to set up a new blog.
  7. Go to Part2 (logging into your district Gmail account).

Part 2: Logging into your district Gmail account

  1. Click here to log into your district Gmail account. Your username will be your student ID # @rcsd121.org.) Ex. 8123456@rcsd121.org, and your password is your district computer password. (Your district gmail account has unlimited storage space and will give you access to DropBox, which is a great free way to back up your files.)
  2. Open the email from WordPress, and click on the link to verify your email address.
  3. Email Ms. Lawson (2013045 at rcsd121.org) from your district Gmail account.  You will not receive credit if you email me from another email client. Your email should include:
    1. Your first and last name
    2. A link to your WordPress blog. For example, “Stephanie Lawson – My blog URL is SOTAfoundations2.wordpress.com.”

Part 3: Publishing your first blog post

Publish your first post by clicking on this icon at the top of your WordPress screen Screen Shot 2015-07-09 at 9.49.23 AM
Include the following:

  1. Post an image by following these steps:

    1. Go to images.google.com
    2. type in what you are looking for (ex. “cutest kitten in the world”)
    3. click on the image you want to download
    4. control +click -> save images as
    5. save the image to your desktop
    6. Click on the “add media” button Screen Shot 2015-07-09 at 9.50.16 AM
    7. Click on “upload files” Screen Shot 2015-07-09 at 9.51.03 AM
    8. Click on “select file” Screen Shot 2015-07-09 at 9.51.20 AM
  2. Select the image you want to insert
  3. Write a paragraph with the answers to the following questions:

    1. Describe your previous experience with computer art.
    2. Whose is responsible if the computer crashes and your project disappears? What will happen?
    3. How will you back up your work? (hint: blog, Google Drive)
    4. Why is it important to make a blog post every day?
  4. Click “publish” at the bottom of the screen to publish your post. Screen Shot 2015-07-09 at 10.12.00 AM
  5. If you have time, help your classmates set up their blogs.

Part4: Creating a Shared Media Folder in Google Drive

  1. Log into your school Gmail account. (Username: student # @rcsd121.org; Password: same password you use to log into the school computers.)
  2. Click on the squares in the top right corner of the screen and select Drive
    google_drive
  3. Click on “New” on the top left side of the screen and then “Folder” from the drop down menu to create a new folder
    new_folder
  4. Name your folder “LastName_FirstInitial_Foundations2”
  5. Right click on the folder and select “Share.”
    share_folder
  6. Share the folder with me and make sure you give me permission to add items.
    folder_permissions

If you finish early, help classmates or set up the About page of your class blog.

Need help? Please follow the following process:

  1. Check the blog
  2. Ask two classmates
  3. Still stuck? Raise your hand and Ms. Lawson will help you as soon as she is available.

Today we will:

  • Set up your class blog
  • Email Ms. Lawson the link to your class blog from your school Gmail account
  • Publish your first blog post
  • Create a shared Foundations2 folder in your school Google Drive account

Welcome to the Media Component of Foundations 2!

Welcome to the Media Component of Foundations 2. In this class, we will explore a range of digital art techniques, including digital photography, digital illustration, and graphic design.

Today we will look at some of Ms. Lawson’s artwork, preview some of the projects we will create this semester, and set up our class blogs. By the end of this class you should:

  • set up your class blog
  • email Ms. Lawson the link to your class blog from your school Gmail account
  • publish your first blog post

Ms. Lawson’s Artwork

Computer Art
Drawing
Ceramics
Animation

Snore Animation

Why is it important to be skilled with a variety of art materials and styles?

What will we do this semester?

Here is an overview of projects we will create this semester.

Part 1: Setting Up Our Class Blogs

Part 1A (If you do not have a WordPress account from Foundations 1): Setting up a WordPress account
  1. Click here to set up a WordPress account. (This will be your Foundations 2 class blog.) You may choose any free template you like, but keep in mind that you will need to post both text and images, so you should pick a template that supports both of these requirements well.Use your school Gmail address (890….@rcsd121.org) – you will have to verify your email in order to publish blog posts.
  2. Go to Part2 (logging into your district Gmail account).
Part 1B (If you have a WordPress account from Foundations 1): Creating a new blog within an existing WordPress account 
  1. Go to wordpress.com and log into your account. Your email address should be your student ID # @rcsd121.org.
  2. Click on “My Sites” at the top left side of the screen. 
  3. Scroll all the way to the bottom and select “WP Admin”
  4. Click on “My blogs”
  5. Click “Register another blog” at the bottom of the screen.
  6. Follow the prompts to set up a new blog.
  7. Go to Part2 (logging into your district Gmail account).

Part 2: Logging into your district Gmail account

  1. Click here to log into your district Gmail account. Your username will be your student ID # @rcsd121.org.) Ex. 8123456@rcsd121.org, and your password is your district computer password. (Your district gmail account has unlimited storage space and will give you access to DropBox, which is a great free way to back up your files.)
  2. Open the email from WordPress, and click on the link to verify your email address.
  3. Email Ms. Lawson (2013045 at rcsd121.org) from your district Gmail account.  You will not receive credit if you email me from another email client. Your email should include:
    1. Your first and last name
    2. A link to your WordPress blog. For example, “Stephanie Lawson – My blog URL is SOTAfoundations2.wordpress.com.”

Part 3: Publishing your first blog post

Publish your first post by clicking on this icon at the top of your WordPress screen Screen Shot 2015-07-09 at 9.49.23 AM
Include the following:

  1. Post an image by following these steps:
    1. Go to images.google.com
    2. type in what you are looking for (ex. “cutest kitten in the world”)
    3. click on the image you want to download
    4. control +click -> save images as
    5. save the image to your desktop
    6. Click on the “add media” button Screen Shot 2015-07-09 at 9.50.16 AM
    7. Click on “upload files” Screen Shot 2015-07-09 at 9.51.03 AM
    8. Click on “select file” Screen Shot 2015-07-09 at 9.51.20 AM
  2. Select the image you want to insert
  3. Write a paragraph with the answers to the following questions:
    1. Describe your previous experience with computer art.
    2. Whose is responsible if the computer crashes and your project disappears? What will happen?
    3. How will you back up your work? (hint: blog, Google Drive)
    4. Why is it important to make a blog post every day?
  4. Click “publish” at the bottom of the screen to publish your post. Screen Shot 2015-07-09 at 10.12.00 AM
  5. If you have time, help your classmates set up their blogs.

Part4: Creating a Shared Media Folder in Google Drive

  1. Log into your school Gmail account. (Username: student # @rcsd121.org; Password: same password you use to log into the school computers.)
  2. Click on the squares in the top right corner of the screen and select Drive
    google_drive
  3. Click on “New” on the top left side of the screen and then “Folder” from the drop down menu to create a new folder
    new_folder
  4. Name your folder “LastName_FirstInitial_Foundations2”
  5. Right click on the folder and select “Share.”
    share_folder
  6. Share the folder with me and make sure you give me permission to add items.
    folder_permissions

Need help? Please follow the following process:

  1. Check the blog
  2. Ask two classmates
  3. Still stuck? Raise your hand and Ms. Lawson will help you as soon as she is available.

Today we will:

  • Go over the Course Criteria Sheet
  • Look at some of Ms. Lawson’s artwork & preview projects we will work on this year
  • Set up your class blog
  • Email Ms. Lawson the link to your class blog from your school Gmail account
  • Publish your first blog post
  • Create a shared Media2 folder in your school Google Drive account