Bringing Our Character into Animate

Today’s essential question: How can I bring the character I created in Illustrator into Animate?

How to Bring the Character You Created in Illustrator into Animate:

  1. Open the PDF of your finished character in Illustrator illustrator_icon.png
  2. Save your file as an Illustrator (.ai) file.
    (File -> Save As -> Illustrator (ai))
    save_as_ai
  3. Open Adobe Animate animate_icon
  4. Create a new file the same dimensions as the Illustrator file of your character
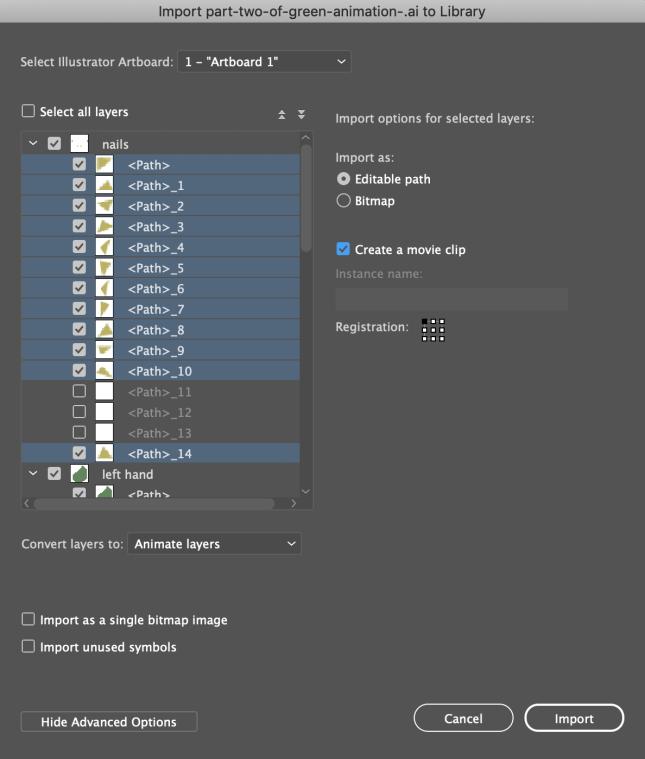
  5. Import the Illustrator (ai) file of the character that you just saved
    (File -> Import -> Import to Library)
    file_import_to_library
    Select the Illustrator (.ai) file
  6. Hold down the shift key to select all the layers you want to import. Then check the box to make sure each layer gets converted to its own movie clip. (This will save you tons of time so you don’t have to convert body parts individually later on. If you want to quickly import all layers, you can check the “Select All Layers” box at the top left.)
    converting_to_movie_clips
  7. Drag your body parts onto the stage, making sure each body part is on its own layer. Name your layers!
  8. Use the transform tool to adjust rotation points BEFORE setting any key frames or animating anything.
  9. Save your Animate file regularly to avoid losing any work.

Today we will:

  • Finish tracing over our character sketches in Illustrator, tracing each moveable part as a separate shape
  • Bring our character into Animate and prepare our Animate file so we can animate the character next class.
  • Create a new blog post with an image of the work we created today. (If you are working in Animate, you can post screen shots of your library & timeline.)

Breaking our character into body parts that can be animated

Today’s essential question: How can I break my character into body parts I can animate?

Today we will finish sketching our character from both the front and side views, and will label the rotation points and how we plan to make our character move. Here are some examples of students who are ready to build their character in Illustrator:

Once Ms. Lawson has approved your sketches, you can begin building your character in Illustrator. You will need to trace each body part as a separate shape, and certain body parts may need to be broken into several shapes that overlap, as in the example below. Why is it important to have overlapping separate shapes?


Today we will:

  • Finish our character sketches and label any rotation points and planned movements
  • Trace over our character sketches in Illustrator, tracing each moveable part as a separate shape
  • Create a new blog post with an image of the work we created today

New Project: Animated Character GIF

Today’s essential question: How can I created a looping GIF of an original animated character in Adobe Animate?

Here are some examples of animated GIFs that would fulfill project requirements:

Project Requirements:

  • Original character created by YOU in Illustrator and animated in Animate  (no copyrighted characters!)
  • Contains at least 3 moving body parts
  • Animation brings character’s personality to life
  • Animation loops seamlessly (first frame is the same as the last frame)
  • Smooth, realistic animation created in Adobe Animate incorporates:
    • tweens
    • easing
    • squash & stretch
    • minimum of 60 frames

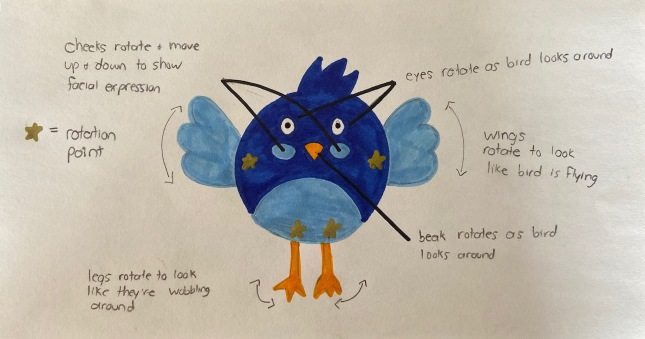
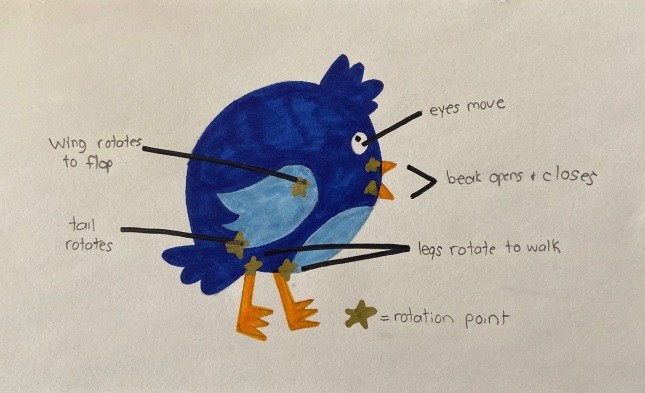
Here is an example of what I am looking for in today’s sketch.
Remember to draw two different views of your character and label each rotation point and how that body part will move:

bird_sketch.jpg
bird_sketch_side_view.jpg

Today we will:

  • Introduce the animated character project
  • Sketch potential character designs from two different viewpoints, including notes on how the character will move
  • Add color to our character with Sharpie
  • Post a photo of our character sketch to our blogs

Animation Tutorials Day 3: More Rotation Points

Today’s essential question: How can I design a character with moving body parts in Animate?

blue_bird.gif

Today we will animate a bird to review what we learned about rotation points last class. Start by downloading the “bird animation” folder Ms. Lawson has shared with you in Google Drive. You may animate any color bird you like, and you get to design how your bird behaves.

Things to remember (follow these steps in order to prevent a stressful weird animation):

  • Create a new Animate Document that is 900px wide by 800px tall
  • Import the bird.psd of your choice. Convert all graphics to symbols when you import the bird.psd file.
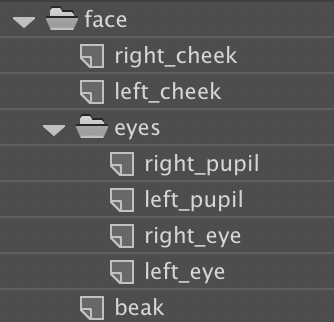
  • Put each body part on a separate layer layers.
    You can use folders folder to organize your layers:
    folder_organization
  • THEN use the transform tool rotation_point_end to move all rotation points to the correct locations
  • THEN set key frames keyframes in the spots in the timeline where you want your action to change
  • THEN use the transform tool rotation_point_end to rotate or move body parts at various keyframes keyframes
  • THEN add tweens tweens
  • THEN add eases
  • Save your animation as a .fla file
  • Export your animation as a GIF

Today we will:

  • Animate a bird to review what we learned about rotation points last class
  • Upload both the Animate and gif files to the animation folders in our school Google Drive accounts, and make sure we have shared the folder with Ms. Lawson
  • Create a new blog post with the following:
    • gif of completed Bird Animation
    • a few sentences on our blog summarizing any challenges you faced today, how you worked through those challenges, and how you currently feel about computer animation.
  • Finish any missing/incomplete animation tutorials (bouncing ball and cat) and post them to your blog

Animation Tutorials Day 2: Rotation Points

Today’s essential question: How can I use the transform tool and rotation points to animate a moving character in Adobe Animate? 

Today we will complete the Cat Rotation tutorial. Then we will finish any missing/incomplete animation tutorials from last week.

Cat Rotation Tutorial

This tutorial will teach you how to set anchor points and how to rotate objects around those anchor points. You will need to sign into your school Google Drive account, open the Animation folder I have shared with you, and download the “black_cat.psd” file. Do not try to save the image from this blog post, as it will not have the body parts on separate layers like PSD file in Google Drive does.


Today we will:

  • Complete Cat Rotation tutorial, upload both the Animate and gif files to the animation folders in our school Google Drive accounts, and make sure we have shared the folder with Ms. Lawson
  • Create a new blog post with the following:
    • gif of completed Cat Rotation Animation
    • a few sentences on our blog summarizing any challenges you faced today, how you worked through those challenges, and how you currently feel about computer animation.
  • Finish any missing/incomplete assignments post them to your blog

Animation Tutorials Day 1: Bouncing Ball

Today’s essential questions: How can I use the principles of animation to animate a bouncing ball in Adobe Animate? 

Today we will begin our animation unit by animating a bouncing ball in Adobe Animate.

Bouncing Ball Tutorial


Open Adobe Animate on your computer.
Then follow the steps in this handout to animate a bouncing ball! (Note: The tutorial was written for an older version of Animate. If you notice any issues, please let Ms. Lawson or Ms. Manhardt know.)

Exporting an Animated GIF to upload to your blog

You will need to save all your Animate files and upload them to your Google Drive (this will also allow you to open up the file and make changes at a later date if needed), but you will not be able to post this file format to YouTube. Therefore, you must also export an animated GIF of each tutorial in order to receive credit. Here is how you can export an animated GIF:

  1. Click File -> Export -> Export Animated GIF
  2. Uncheck the transparency box, name your file with your name, and press export
  3. Upload the animated GIF in today’s blog post

Make sure you are also saving the Animate file (File -> Save) and uploading that to your shared Google Drive Foundations 2 Media folder. You will need the Animate file to be able to go back and make any changes.

Today we will:

  • Complete the Bouncing Ball tutorial
  • Upload the Animate file to our shared Google Drive Foundations 2 folder
  • Create a New Blog Post with the Following
    • an animated GIF of the Finished Bouncing Ball Animation
    • a few sentences describing any challenges you faced and how you worked through those challenges

Welcome to the Media Component of Foundations 2!

n-CAT-COMPUTER-628x314

Today’s essential question: What do I need to do to be successful in the Media component of Foundations 2?

Today we will look at some of the projects we will create this year, set up our Foundations2 folders in Google Drive, learn how to use the Pen Tool in Adobe Illustrator, and publish our first blog post. By the end of this class you should:

  • Discuss tracking sheets, grading policy, and view examples of the projects we will create in this class
  • Create a Media2 folder in your school Google Drive account and share it with Ms. Lawson (2013045@rcsd121.org)
  • Complete the Vector Practice Assignment
  • Publish your first blog post

Introducing Ms. Manhardt, Our Student Teacher

Ms. Manhardt is our student teacher from RIT. She will be with us for the next five weeks. You can learn more about Ms. Manhardt here, and can view Ms. Manhardt’s portfolio site here.

Part1: Overview of Foundations 2 Media Projects

Here are some examples of the types of projects we will create in this class.
Which projects are you most excited by?

Part2: Creating a Shared Media Folder in Google Drive

  1. Log into your school Gmail account. (Username: student # @rcsd121.org; Password: same password you use to log into the school computers.)
  2. Click on the squares in the top right corner of the screen and select Drive
    google_drive
  3. Click on “New” on the top left side of the screen and then “Folder” from the drop down menu to create a new folder
    new_folder
  4. Name your folder “LastName_FirstInitial_Foundations2”
    new_folder_name
  5. Right click on the folder and select “Share.”
    share_folder
  6. Share the folder with me and make sure you give me permission to add items.
    folder_permissions

Need help? Please follow the following process:

  1. Check the blog
  2. Ask two classmates
  3. Still stuck? Raise your hand and Ms. Lawson will help you as soon as she is available.

Part 3: Vector Art & The Pen Tool in Adobe Illustrator

Today’s essential question: How can I use the pen tool to create vector imagery in Adobe Illustrator?

Remember how scaling a raster image larger will pixelate the image (as in the example below)?
pixelated_escher_screen_shot

Today we will learn about a different type of image called a vector. Vector images can be scaled infinitely and will never get blurry. Logos are usually vector images so they can be printed on everything from buttons to billboards without becoming blurry.

Here are some examples of vector art:

air-jordan-logo-brand-1000x500   OVO OWL1-B-LOGO-JPG


Vector Practice Tutorial

Today we will view a demo at the Smart Board and then follow these steps to learn how to use the pen tool in Adobe Illustrator:

Part 1: Setting Up the File
  1. Right-click to save the image below:
    vector_practice
  2. Open Adobe Illustrator.
  3. Select “New Print Document” from the pop up screen.
  4. Create a new file in Adobe Illustrator with the following guidelines:
    1_file_setup
  5. Place the image you just downloaded from this blog post. (File -> place)
    DO NOT try to open your downloaded image in Illustrator! This will cause strange things to happen.
Part 2: Using the Pen Tool to Draw Straight Lines
  1. Create a new layer by clicking on the “new layer” button at the bottom of the layers palette on the right side of the screen. new_layer_button
  2. Select the pen tool. pen_tool
  3. You can change the color by clicking on the square at the bottom of the toolbar on the left hand side of the screen: 2_color_change
  4. Trace over your first shape (the star). Click once to add the first anchor point. Move your mouse to the next position and click again to create the second point. The two anchor points will be connected together.3_star1
  5. Continue clicking points around the star IN ORDER until you reach the starting point.
    4_star2
    5_star3
    (You may need to decrease the opacity of the star you are drawing so you can see what you are tracing. You can do this by clicking on the transparency icon on the right side of the screen and decreasing the opacity so it is below 100. transparency_window)
    6_star4
  6. Close the path by clicking on the starting point a second time. Bring the opacity back 100% and adjust the color if necessary.
    7_star5
Part 3: Using the Pen Tool to Draw Curves
  1. Click to create your first point.
  2. Click where you would like your next point to be, but do not let go of the mouse until you have dragged the point to adjust the curve:
    heart1
  3. Click on the middle dot. This should make the second half of the tangent line, or handle, disappear:
    heart2
  4. Click where you would like your next point to be, but do not let go of the mouse until you have dragged the point to adjust the curve:
    heart3
  5. Once again, click on the middle dot. This should make the second half of the tangent line, or handle, disappear:
    heart4
  6. Continue adding points around the heart in order. Close the path by clicking on the starting point a second time.
    heart5
  7. Follow the same steps to outline the apple.
  8. Follow the same steps to outline the dog.
Part 4: Saving your file and posting to the blog
  1. Save your file as a .pdf (File -> Save As -> PDF)
  2. Save your file as a .png (File -> Save for Web & Devices -> PNG-24)
  3. Create a new blog post with both a PDF and PNG of your work

Today we will:

  • Discuss tracking sheets, grading policy, and view examples of the projects we will create in this class
  • Create a Media2 folder in your school Google Drive account and share it with Ms. Lawson (2013045@rcsd121.org)
  • Complete the pen tool mini lesson in Adobe Illustrator
  • Save our file as a PDF
  • Create a new blog post with the following:
    • the PDF file of our completed mini lesson
    • a PNG of our completed mini lesson
    • a few sentences describing any challenges you faced, how you worked through them, and how you feel about the pen tool