Low-Poly Self-Portrait: Using the Align Palette to Connect Triangles

Today’s essential question: How can I use the align palette to connect triangles?

How to align points to fill in gaps

  1. Open the alignment palette. (Window -> Alignment)
    alignment_palette
  2. Select the white arrow. white_arrow Hold down shift and select the points you wish to align. Points that are not selected should remain white, and points that are selected should change to a color.
  3. Click vertical in the alignment palette.
    vertical_align
  4. Click horizontal align in the alignment palette.
    horizontal_align
  5. Continue until you have filled in all the gaps between triangles.
    align_all
  6. Save your file as both a PDF and PNG and upload your progress to your blog.

Today we will:

  • Continue working on our projects in Illustrator
  • Upload our reference photo and PDF project file to our Google Drive accounts
  • Publish a new blog post with the followig:
    • a PDF of our progress
    • a PNG of our progress
    • a few sentences describing what was easy and what was difficult

Low-Poly Portrait: Filling in the Triangular Mesh with Color

Today’s essential question: How can I use the eyedropper tool to fill in the triangular mesh with accurate color?

How to fill in the triangular mesh

  1. Use the black arrow black_arrow to select a triangle.
    select_first_triangle_cropped
  2. Use the eyedropper tool eyedropper to select a color in the middle of the triangle. This will change the fill color.
    fill_first_triangle_cropped
  3. Continue until you have filled in all of the triangles.
    fill_all_triangles

Hint: You can save time by using keyboard shortcuts. “A” will select the arrow tool, and “I” will select the eyedropper tool.

Today we will:

  • Continue working on our low-poly projects in Illustrator
  • Upload our reference photo and PDF project file to our Google Drive accounts
  • Publish a new blog post with the following:
    • a PDF of our progress
    • a PNG of our progress
    • a few sentences describing what was easy and what was difficult

Low Poly Self-Portrait Day 2: Creating a Triangular Mesh

Today’s essential question: How can I create a triangular mesh to capture value changes on my self-portrait in Illustrator?

Do NOT begin working in Illustrator until Ms. Lawson has approved the photo you would like to use, and you have cropped it according to the instructions in last class’s blog post.

Value is an Element of Design. 

Value Definition

Value works on a scale: 

values

What to Do

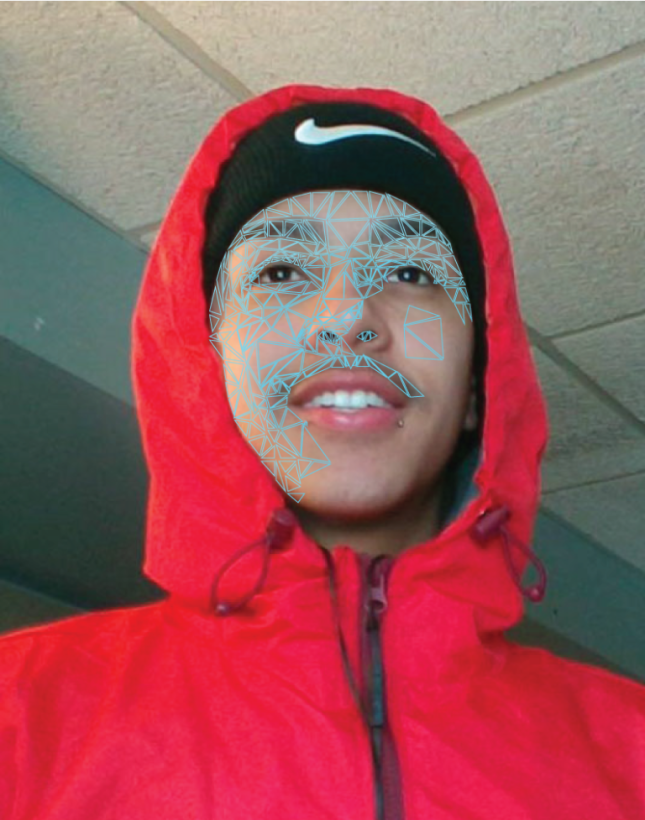
To create the low-poly effect, you will draw triangles over your reference photo to show the changes in value, as in the example below:
triangle_example.png

What NOT to Do:

Do NOT draw triangles that cover multiple values, such as the example below:

Poly-Exemplar_Thompson

What is wrong with where these triangles are placed?

Random Value_Connected Triangles

The triangle on the nose covers too many value changes.

The triangles on the cheek are too close. Some are over lapping.

Randomly Spaced

These triangles are randomly spaced.

They will leave too many gaps and it will be difficult to fix later.

Too much space_Random Values

One of the triangles is open. They are randomly spaced.

Some of them cover more than one value.

How to Create Your Low-Poly Self Portrait

Part 1: Set Up your File in Illustrator

  1. Create a new file in Illustrator (File -> New Print Document)
  2. Set the dimensions to 11×14 inches
  3. Place your reference photo in the Document (File -> Place)
  4. Scale the reference photo so it fits within the edges of the document
  5. Lock your reference layer
  6. Save your file as a PDF

Part 2: Create a triangular mesh

  1. Create a new layer new_path_icon
  2. In the bottom left corner, set your fill options to “outline only,” and change the outline color to something bright that will contrast with your skin tone.
    bright_blue_no_fill
  3. Select the pen tool. pen_tool
  4. Use the pen tool to draw triangles over the entire portrait. Each triangle should represent a shift in value.
    triangular_mesh

Save your file as both a PDF and PNG and upload your progress to your blog.

Today we will:

  • Begin creating our projects in Illustrator
  • Upload our reference photo and PDF project file to our Google Drive accounts
  • Publish a new blog post with the followig:
    • a PDF of our progress
    • a PNG of our progress
    • a few sentences describing what was easy and what was difficult

New Project: Low-Poly Self-Portrait

Today’s essential question: What are some characteristics of a good self-portrait?

Today we will begin our new project – Low-poly self-portraits in Adobe Illustrator.

Here are some examples created by SOTA students (and Ms. Lawson!):

Examples of Bad Reference Selfies:

What are some issues with these selfies?

What are some characteristics of a good self-portrait reference photo?

Project Requirements:

  • 11×14″ (portrait) or 14×11″ (landscape)
  • created in Adobe Illustrator with the pen tool
  • Uses a reference photo of yourself. Can be either a current photo or a baby/childhood photo.
  • Shows high-quality craftsmanship and technical skill with the pen tool
  • Piece displays unity both in the style of line/shape and color scheme
  • Daily progress posted to class blog. Computers malfunction, and it is your responsibility to back up your work to a USB Drive or your Google Drive.

Part 1: Take your reference photo

Use your phone or a class camera to take your reference photo. You may also use an existing selfie as long as no parts of your face are obscured.

Part 2: Make sure your image is the correct size in Photoshop

  1. Open the file in Photoshop
  2. Select the crop tool from the toolbar on the left side of the screen crop_tool
  3. At the top of the screen, set the dimensions to 11×14 inches
    crop_dimensions
  4. Drag the crop tool to select the area you would like to crop
  5. Press the “enter” key to crop your photo
  6. Save your reference photo

Today we will:

  • Introduce the low-poly portrait project
  • Take our reference photos
  • Crop our reference photos in Photoshop to the correct dimensions
  • Post our reference photos to our blogs