Balancing the Space in Your Design

Today’s essential question: How can I balance the space in my design?

Positive space refers to areas where the subject is positioned.

Negative space is the area surrounding the subject. Don’t think of negative space as blank. In a well-designed composition, negative space is carefully designed to support the positive space in the picture.

There is no rule on how to achieve perfect spacing. In fact, truly even spacing often feels boring or static. This artwork by MC Escher is a good example of balanced spacing that, upon closer inspection, is much less “perfect” than one would initially think:

Here are some in progress examples of student projects that are balancing positive and negative space well. Notice how some have more negative space, and some have more positive space, but they all feel balanced:

Today we will:

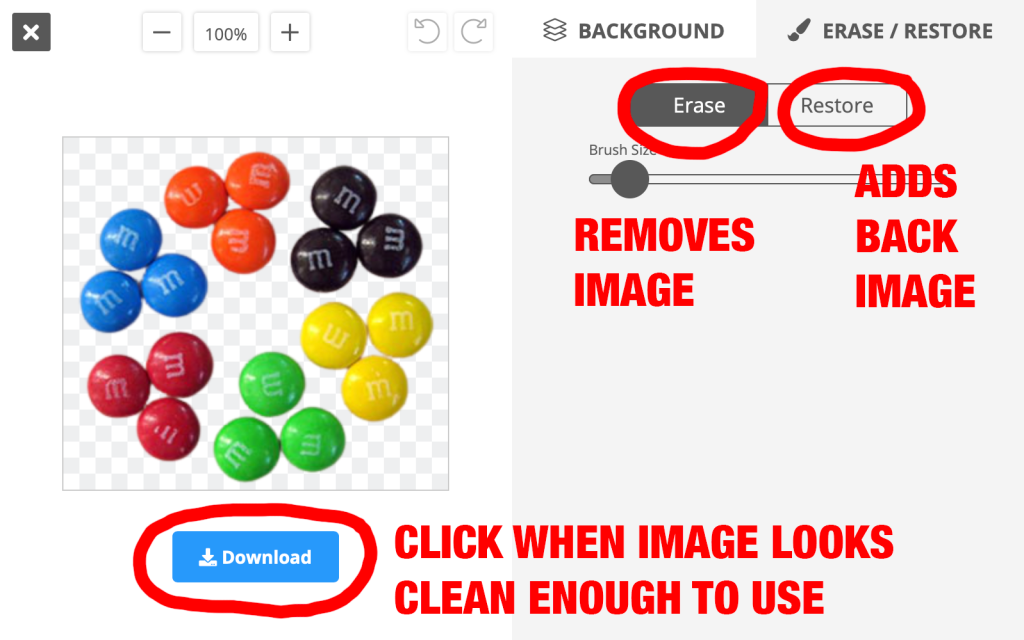
  • Continue creating our Everyday Object Digital Collage in Pixlr, Photopea, Procreate, or Photoshop
  • Create a new blog post with the following:
    • an image of our digital collage so far
    • a few sentences describing what went well today, as well as any challenges you faced


Selecting Appropriate Images for your Collage

Today’s essential question: What are some characteristics of good images for this digital collage project? How can I pick better images?

Examples of “good” object photos that will work well in this collage project:

Check out these examples from one of my other classes. Notice the following things:

  • Photos are all taken from the same angle (directly above the object)
  • Objects have similar shape
  • Objects have a similar theme
  • Objects have been separated out

Comparing “good” versus “bad” object photos

Now let’s compare some “good” versus “bad” images (in terms of what will work for this project:

Image is too complex and makes an awkward collage when repeated

Check the comments I have left on last class’s assignment. Many of you will need to either pick new images, or make some changes to your existing images, such as separating out each object.

Today we will:

  • Finalize the images we are using in our collage by:
    • picking new images (if necessary) and removing the backgrounds
    • separating out images (if necessary)
  • Post today’s work to our blogs

Creating a Digital Collage with Pixlr

Today’s essential question: How can I use the Pixlr app to create a digital collage?

These steps show how to create a digital collage using the free app Pixlr, which runs on Chromebooks. If you have access to Photoshop or Procreate at home and are familiar enough with them to be able to complete the project, you are welcome to use either of those programs instead. For the sake of keeping things simple, all of my tutorials will involve Pixlr, since everyone has access to it.

How to create a digital collage in Pixlr

  1. Go to Pixlr.com and select Pixlr E. Click “Create New”
  2. Create a new file. Select Instagram 1080 x 1080 px. (Normally we would work much larger, but working this size will keep your Chromebook from crashing. If you have a personal computer or iPad, you may want to select the UHD 2160×2160 option so you have the option of printing your project at a later date.)
  3. Name your file
  4. Import the first image you would like to use in your collage by pressing the “+” button on the right side of the screen near the layers palette. Then select “Image” as the type of layer you’d like to add:
  5. Transform the size of your object or rotate it. Edit -> Free Transform
  6. Use the move tool to drag objects around the canvas
  7. Duplicate your layer as many times as you need to in order to create multiples of the same object:
  8. If you want to, Pixlr makes it easy to flip images horizontally or vertically:

    (Edit -> Transform -> Flip Horizontal OR Flip Vertical)
  9. Save your image as a PNG and post your progress to your blog. Make sure you are logged in/create a Pixlr account so you are able to go back and continue working on your project next class.

Today we will:

  • Begin creating our Everyday Object Digital Collage in Pixlr, Procreate, or Photoshop
  • Create a new blog post with the following:
    • an image of our digital collage so far
    • a few sentences describing what went well today, as well as any challenges you faced

Removing Backgrounds with Remove.bg

Today’s essential question: How can I use the Remove.bg app to easily remove backgrounds from the images I want to use in my collage?

Today we will finish downloading/photographing the images we will use in our digital collage. We will then use the Remove.bg app to remove the backgrounds from these images. When we are done, we will publish a new blog post with these images with the backgrounds removed.

How to Remove the Background from an Image with the Remove.bg App

  • Save the image to your computer and go to Remove.bg.
  • Click Upload Image
  • Poof – your background is gone:
RemoveBG.PNG
  • You may need to do a bit of adjusting to remove parts of the background that were missed. If so, click the Edit button:
  • Sometimes the app leaves parts of the background behind, or accidentally erases parts of the image you wanted to keep. Once you are in “Edit,” you can use the “Erase” option to remove any remaining pieces of the background, and the “Restore” option to add back parts the image that were incorrectly removed. You can drag the slider to make the eraser/restore brush bigger or smaller:
  • Once you are happy with your image, click the “Download” button to save it to your computer.

Today we will:

  • Finish downloading/photographing the images we will use in our digital collage
  • Use the Remove.bg app to remove the backgrounds from these images. 
  • Publish a new blog post with these images with the backgrounds removed.

New Project: Everyday Object Digital Collage

Today’s essential questions: 
How can I utilize the art elements of color, shape, and value to create an aesthetically pleasing work of art? 
How can I use symmetry to create balanced artwork with little to no negative space? 

Featured Artist: Adam Hillman

Multimedia artist Adam Hillman creates beautiful arrangements from everyday objects. He arranges the objects to create satisfying patterns by utilizing differences in color and texture.

He has also arranged everyday objects to re-create famous works of art:

Project requirements:

  • Digital collage created in Pixlr, Photoshop, or Procreate
  • Dimensions are 2160×2160 px
  • Arrangement contains a minimum of 50 separate pieces (most of these will be duplicated layers of the same image)
  • Images show unity through color, shape, or texture
  • Image contains little to no negative space – entire square should be filled with objects
  • Focal point/contrast created through variety of color, scale, or value
  • EITHER a balanced, nonobjective symmetrical design (like the examples in the first gallery) OR an illustration (like the examples in the second gallery)

Today we will:

  • Discuss the work of Adam Hillman
  • Brainstorm ideas for our Every Day Objects Digital Collage
  • Create a Project Proposal blog post with the following:
    • Any images you may use in your artwork
    • A sketch outlining how you will arrange these images in your artwork
    • A paragraph describing your concept that answers the following questions:
      • What type of image will you create?
      • What types of objects will you use to create your image?
      • How will you utilize color, shape, and value in your work (ie. “I will arrange objects of the same shape in gradually darker colors to create a gradient.”)