Project Feedback

Ms. Lawson has left each person a Post-It Note with feedback on what to do next with their project. Today we will follow the advice on the Post-It Note. You should be done shading your figure by the end of today’s class, which will leave two classes to work on the background.

Make sure you post a photo of today’s work to your blog in order to receive participation points for the day. 

Creating a Strong Focal Point

Today’s essential question: How have I created a strong focal point in my foreshortening project?

We don’t want the viewer to randomly focus on part of our artwork. On the contrary, a good artist will manipulate the viewer into seeing what they want the viewer to see, and to spend the most time on the part of the artwork they feel is most important. We can do this by incorporating contrast and movement into our artwork, and by making our desired focal point the most interesting part of our artwork. This rewards the viewer for spending time looking at the focal point.

You can create a strong focal point by creating a spot in your artwork where the eye can see the most:

  • Value contrast (dark against light)
  • Hard edges and detail (especially texture)
  • Size contrast (whatever is largest will appear closest to the viewer and tends to create a natural focal point)

Anything that is not included in the focal point should consist of low value contrasts, soft edges, simplicity in shape and the lack of detail.

Today we will:

  • Continue working on our figure foreshortening project, creating a strong focal point by adding the most detail to the most important part of the artwork (where we want the viewer to spend the most time)
  • Post a photo of today’s work to our blogs


Telling a Story

Please place your completed square artwork in your folder. Make sure you have written your name on the back.

Today’s essential question: How can I combine backgrounds or props with my foreshortened figure to tell an interesting story?

Look at the examples below. Which pictures have a background that adds to the story? Which pictures could be improved with a different background or some props? What might you add to your project to make it more interesting?

Today we will:

  • Continue working on our figure foreshortening project, thinking of how your subject will interact with the background to tell a story
  • Create a blog post with the following with a photo of today’s work

No blog post with photo of today’s work = 0 participation for the day

Individual Conferences Day 2

Today we will continue meeting one-on-one with Ms. Lawson to go over how each person is doing in this class. Be prepared to show Ms. Lawson the following:

  • your figure foreshortening project
  • your blog
  • your square free project

Ms. Lawson will meet with people in the following order:

  1. Shani
  2. Elyse
  3. Kyla
  4. Rickie
  5. Aquan
  6. Armani
  7. Joel
  8. Carla
  9. Aneasha
  10. Caeline

Ms. Lawson will  not be able to help anyone with their projects/blogs today (aside from individual conferences), so if you are stuck, now is a good time to work on the square project if you have no already done so.

Individual Conferences

Today we will each meet one-on-one with Ms. Lawson to go over how each person is doing in this class. Be prepared to show Ms. Lawson the following:

  • your figure foreshortening project
  • your blog
  • your square free project

Ms. Lawson will  not be able to help anyone with their projects/blogs today (aside from individual conferences), so if you are stuck, now is a good time to work on the square project if you have no already done so.

Review of Project Requirements

Today’s essential question: How does my figure foreshortening project fulfill the project requirements?

Today we will make sure our projects fulfill all the required criteria. If you are not sure, check with Ms. Lawson.

Review of project requirements:

  • Includes at least 50% of a human-like figure
  • Shows understanding of foreshortening
  • Realistic range of value (shading) created with pencil.
    NO colored pencil, ink, oil pastel, etc. Everything must be done in pencil!
  • Background adds to concept
  • Original artwork and concept
  • Strong composition fills 18×24″ paper
  • Quality craftsmanship

Today we will:

  • check to make sure our figure foreshortening project fulfills all the required criteria
  • continue working on our figure foreshortening projects
  • post a photo of today’s progress to our blogs

You must post your progress to the blog to receive participation points for the day.

Figure, Joints, Rotation, and Foreshortening

Today’s essential question: How can understanding how body parts rotate around each joint help an artist draw more realistic figures?

Look at the examples below. Why do you think the artist has emphasized the joints in each drawing?
How does locating the joints help maintain proportions in foreshortened poses?

stick-figure-practice2

points_of_rotation

Today we will:

  • continue drawing our foreshortened figures on our final project paper
  • post a photo of  today’s progress to our blog

No blog post = 0 participation for the day

Advanced Shading with Drawing Pencils

Today’s Essential Question: How can I use different types of drawing pencils (2H, 2B, 6B, etc) to create a dramatic range of value in my drawing?

lead_grade_swatches-11

If you have a set of drawing pencils, you should be using different pencils at different points in the project. Anything with an H in the name is a lighter pencil, which is great for sketching out basic shapes and marking off space in the early stages of a project.

Regular #2 pencils are the same as an HB pencil, which is a pencil of medium darkness. If you don’t have drawing pencils, use a regular pencil to lightly sketch out the basic layout of the project.

At this point in the project, stay away from anything in the B range – we will use B pencils later in the project to intensify our shadows. If you don’t have an entire set of drawing pencils, you may want to purchase just one 6B Ebony pencil. It will let you create darker values (almost true black) with pencil.

Today we will:

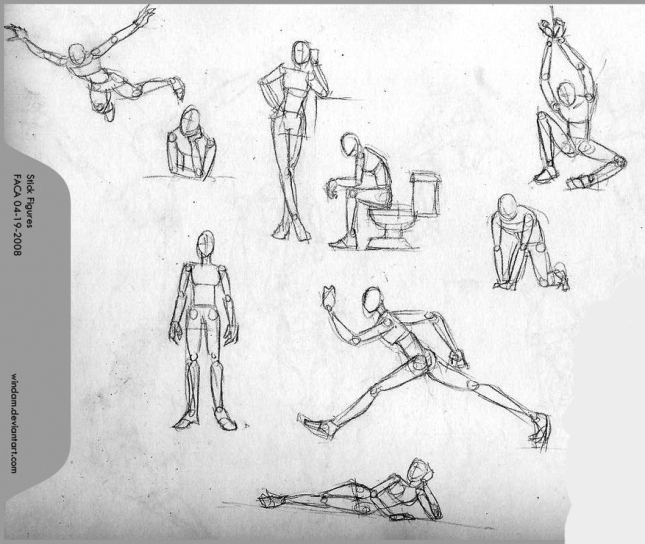
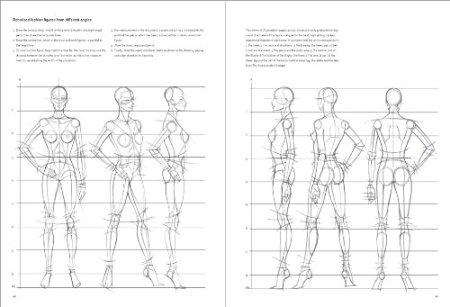
  • continue drawing our foreshortened figures on good paper, using light pencil
  • post a photo of our work today to our blogs

No blog post = 0 participation for the day

The Rule of Thirds

Today’s Essential Question: How can I use the rule of thirds to create a dynamic composition?

Rule of Thirds

To apply the rule of thirds to your photograph, break an image down into thirds (both horizontally and vertically) so that you have 9 parts. Place points of interest in the intersections or along the lines to create a more balanced and visually interesting photo. Studies have shown that people’s eyes usually go to one of the intersection points rather than the center of the shot. When we use the rule of thirds, we make the way people naturally view images work for us rather than against us.

Why does this photo of Elyse have such a strong composition?

elyse_rule_of_thirds

Here are some other great examples of foreshortening taken last class:

carlos_forshortening_bw tionnie1 tionnie2 max1_bw

The following students should see me for help editing & posting their final reference photo: Caeline, Joel, Charley.

I have printed reference photos for the following people. They should see me to discuss whether or not they would like to use a grid: Carla, Max, Tionnie, Elyse.

Today we will:

  • edit our best photo in Photoshop so that it follows the rule of thirds and are in grayscale
  • post our edited photo to our blog so Ms. Lawson can print it
  • if necessary, take a new reference photo (consult Ms. Lawson to see if this is necessary)
  • begin drawing on 18×24 project paper (consult Ms. Lawson whether you should use a grid to help maintain proportions)
  • create a new blog post with a photo of today’s progress

You must post your work to the blog to receive participation points for today’s class.

Camera Angle & Foreshortening

Today’s essential question: How can I create foreshortening by changing the angle of the camera?

Today we will go outside to take the reference photos for our figure foreshortening project.
We will then create a new blog post with our reference photos and a few sentences describing our project concept.

High Angle

In a high angle (bird’s eye view), the camera is above the subject, looking down. High angle shots can make the subject seem vulnerable or powerless, and are usually used to make the image more dramatic.
high angle view of a young man dunking a basketball   high_angle_dog

Low Angle

Low angles (worm’s eye view) are captured from a camera placed below the subject, looking up at them. Low angles make the subject look dominant, aggressive, or ominous.
dave-hill-dynamic-angles   ??????????????????????????????????????????????????????????????????????

Today we will:

  • Discuss how camera angles can impact foreshortening and the mood of the image
  • Take photos outside to use as reference for our foreshortening project
  • Transfer the photos onto our computer and clear the memory card
  • Create a new blog post with the following
    • The best photos taken today
    • A few sentences about the process of taking the photos, and which photo you plan to use as your reference, as well as what you plan to do with the background

Save

Save