Creating Vector Art with the Pen Tool

Today’s essential question: How can I use the pen tool to create vector imagery in Adobe Illustrator?

Remember how scaling a raster image larger will pixelate the image (as in the example below)?
pixelated_escher_screen_shot

Today we will learn about a different type of image called a vector. Vector images can be scaled infinitely and will never get blurry. Logos are usually vector images so they can be printed on everything from buttons to billboards without becoming blurry.

Here are some examples of vector art:

air-jordan-logo-brand-1000x500   OVO OWL1-B-LOGO-JPG


Vector Practice Tutorial

Today we will begin tracing over our t-shirt design sketches in Adobe Illustrator.
We will view a demo at the Smart Board and then follow these steps:

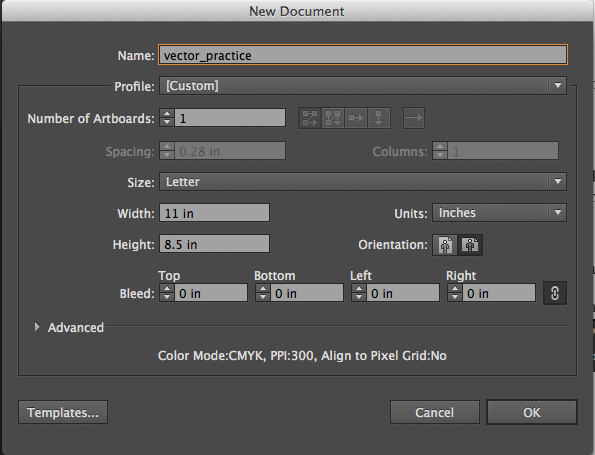
Part 1: Setting Up the File
  1. Right-click to save the image below:
    vector_practice
  2. Open Adobe Illustrator.
  3. Select “New Print Document” from the pop up screen.
  4. Create a new file in Adobe Illustrator with the following guidelines:
    1_file_setup
  5. Place the image you just downloaded from this blog post. (File -> place)
    DO NOT try to open your downloaded image in Illustrator! This will cause strange things to happen.
Part 2: Using the Pen Tool to Draw Straight Lines
  1. Create a new layer by clicking on the “new layer” button at the bottom of the layers palette on the right side of the screen. new_layer_button
  2. Select the pen tool. pen_tool
  3. You can change the color by clicking on the square at the bottom of the toolbar on the left hand side of the screen: 2_color_change
  4. Trace over your first shape (the star). Click once to add the first anchor point. Move your mouse to the next position and click again to create the second point. The two anchor points will be connected together.3_star1
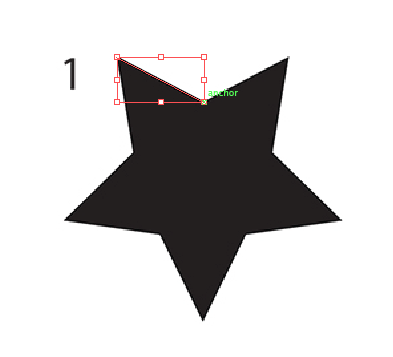
  5. Continue clicking points around the star IN ORDER until you reach the starting point.
    4_star2
    5_star3
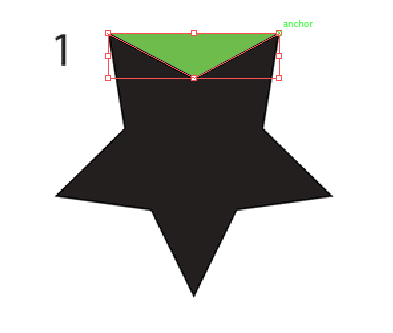
    (You may need to decrease the opacity of the star you are drawing so you can see what you are tracing. You can do this by clicking on the transparency icon on the right side of the screen and decreasing the opacity so it is below 100. transparency_window)
    6_star4
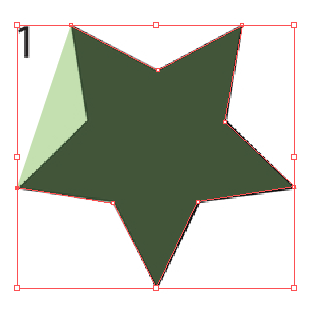
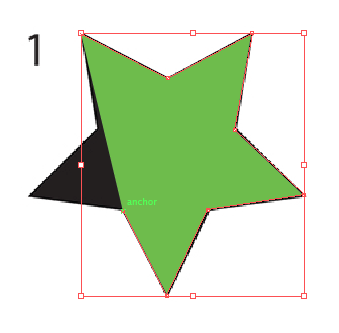
  6. Close the path by clicking on the starting point a second time. Bring the opacity back 100% and adjust the color if necessary.
    7_star5
Part 3: Using the Pen Tool to Draw Curves
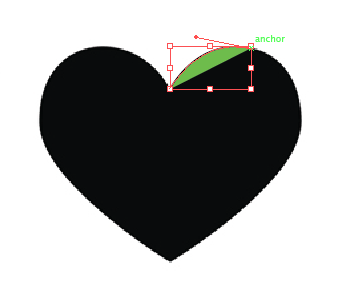
  1. Click to create your first point.
  2. Click where you would like your next point to be, but do not let go of the mouse until you have dragged the point to adjust the curve:
    heart1
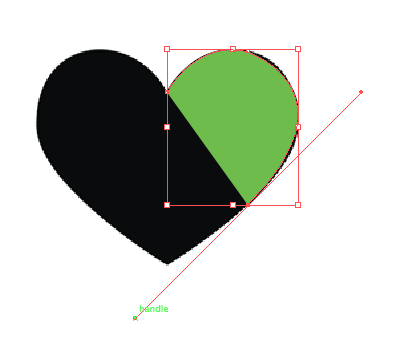
  3. Click on the middle dot. This should make the second half of the tangent line, or handle, disappear:
    heart2
  4. Click where you would like your next point to be, but do not let go of the mouse until you have dragged the point to adjust the curve:
    heart3
  5. Once again, click on the middle dot. This should make the second half of the tangent line, or handle, disappear:
    heart4
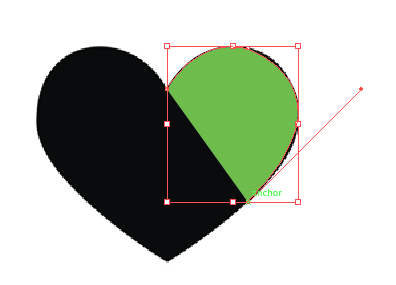
  6. Continue adding points around the heart in order. Close the path by clicking on the starting point a second time.
    heart5
  7. Follow the same steps to outline the apple.
  8. Follow the same steps to outline the dog.
Part 4: Saving your file and posting to the blog
  1. Save your file as a .pdf (File -> Save As -> PDF)
  2. Create a new blog post with the PDF of your progress.

Missing Blog Links

The following students still need to email me the link to their class blogs: Shanijah, Passion

Missing/Incomplete First Blog Post

The following students still need to publish their first blog post: Dynasti, Shanijah, Eysha (add picture), Karen, Passion. It must include the following:

  • A picture that is meaningful to you
  • The answers to the following questions:
    • Describe your previous experience with computer art.
    • Whose is responsible if the computer crashes and your project disappears? What will happen?
    • How will you back up your work? (hint: blog, Google Drive)
    • Why is it important to make a blog post every day?

Today we will:

  • Complete the pen tool mini lesson in Adobe Illustrator
  • Save our file as a PDF
  • Create a new blog post with the following:
    • the PDF file of our completed mini lesson
    • a few sentences describing any challenges you faced, how you worked through them, and how you feel about the pen tool


Welcome to the Media Component of Foundations 2!

Welcome to the Media Component of Foundations 2. In this class, we will explore a range of digital art techniques, including digital photography, digital illustration, and graphic design.

Today we will look at some of Ms. Lawson’s and Ms. Thompson’s artwork, preview some of the projects we will create this semester, and set up our class blogs. By the end of this class you should:

  • set up your class blog
  • email Ms. Lawson the link to your class blog from your school Gmail account
  • publish your first blog post

Ms. Lawson’s Artwork

Computer Art
Drawing
Ceramics
Animation

Snore Animation

Ms. Thompson’s Artwork

View some examples of Ms. Thompson’s artwork here.

Why is it important to be skilled with a variety of art materials and styles?

What will we do this semester?

Here is an overview of projects we will create this semester.

Part 1: Setting Up Our Class Blogs

Part 1A (If you do not have a WordPress account from Foundations 1): Setting up a WordPress account
  1. Click here to set up a WordPress account. (This will be your Foundations 2 class blog.) You may choose any free template you like, but keep in mind that you will need to post both text and images, so you should pick a template that supports both of these requirements well.Use your school Gmail address (890….@rcsd121.org) – you will have to verify your email in order to publish blog posts.
  2. Go to Part2 (logging into your district Gmail account).
Part 1B (If you have a WordPress account from Foundations 1): Creating a new blog within an existing WordPress account 
  1. Go to wordpress.com and log into your account. Your email address should be your student ID # @rcsd121.org.
  2. Click on “My Sites” at the top left side of the screen. 
  3. Scroll all the way to the bottom and select “WP Admin”
  4. Click on “My blogs”
  5. Click “Register another blog” at the bottom of the screen.
  6. Follow the prompts to set up a new blog.
  7. Go to Part2 (logging into your district Gmail account).

Part 2: Logging into your district Gmail account

  1. Click here to log into your district Gmail account. Your username will be your student ID # @rcsd121.org.) Ex. 8123456@rcsd121.org, and your password is your district computer password. (Your district gmail account has unlimited storage space and will give you access to DropBox, which is a great free way to back up your files.)
  2. Open the email from WordPress, and click on the link to verify your email address.
  3. Email Ms. Lawson (2013045 at rcsd121.org) from your district Gmail account.  You will not receive credit if you email me from another email client. Your email should include:
    1. Your first and last name
    2. A link to your WordPress blog. For example, “Stephanie Lawson – My blog URL is SOTAfoundations2.wordpress.com.”

Part 3: Publishing your first blog post

Publish your first post by clicking on this icon at the top of your WordPress screen Screen Shot 2015-07-09 at 9.49.23 AM
Include the following:

  1. Post an image by following these steps:
    1. Go to images.google.com
    2. type in what you are looking for (ex. “cutest kitten in the world”)
    3. click on the image you want to download
    4. control +click -> save images as
    5. save the image to your desktop
    6. Click on the “add media” button Screen Shot 2015-07-09 at 9.50.16 AM
    7. Click on “upload files” Screen Shot 2015-07-09 at 9.51.03 AM
    8. Click on “select file” Screen Shot 2015-07-09 at 9.51.20 AM
  2. Select the image you want to insert
  3. Write a paragraph with the answers to the following questions:
    1. Describe your previous experience with computer art.
    2. Whose is responsible if the computer crashes and your project disappears? What will happen?
    3. How will you back up your work? (hint: blog, Google Drive)
    4. Why is it important to make a blog post every day?
  4. Click “publish” at the bottom of the screen to publish your post. Screen Shot 2015-07-09 at 10.12.00 AM
  5. If you have time, help your classmates set up their blogs.

Part4: Creating a Shared Media Folder in Google Drive

  1. Log into your school Gmail account. (Username: student # @rcsd121.org; Password: same password you use to log into the school computers.)
  2. Click on the squares in the top right corner of the screen and select Drive
    google_drive
  3. Click on “New” on the top left side of the screen and then “Folder” from the drop down menu to create a new folder
    new_folder
  4. Name your folder “LastName_FirstInitial_Foundations2”
  5. Right click on the folder and select “Share.”
    share_folder
  6. Share the folder with me and make sure you give me permission to add items.
    folder_permissions

Need help? Please follow the following process:

  1. Check the blog
  2. Ask two classmates
  3. Still stuck? Raise your hand and Ms. Lawson will help you as soon as she is available.

Today we will:

  • Go over the Course Criteria Sheet
  • Look at some of Ms. Lawson’s artwork & preview projects we will work on this year
  • Set up your class blog
  • Email Ms. Lawson the link to your class blog from your school Gmail account
  • Publish your first blog post
  • Create a shared Foundations2 folder in your school Google Drive account

Last Class of the Semester

cat_graduation_cap.jpgThis is our last class of the semester. Next semester, you will have Mr. Lattorre’s Drawing & Painting class and Ms. Williams’ 3D class. Please make sure you post all missing and incomplete assignments to your blog by the end of today’s class. If you do not finish, please plan on attending the following Open Studio Hours next week:

  • Monday, 1/22 – 7:30-10:30AM – Ms. Lawson’s room
  • Thursday, 1/25 – 7:30-10:30AM – Ms. Lawson’s room

Missing Assignments:

  • Danny: Multiple Mes Artist Statement, Propaganda Poster Project, Propaganda Poster Artist Statement
  • Omarion: Propaganda Poster Project, Propaganda Poster Artist Statement
  • Avery: Propaganda Poster Project, Propaganda Poster Artist Statement
  • Jayden: Multiple Mes Project, Multiple Mes Artist Statement
  • Aquan: Propaganda Poster Project, Propaganda Poster Artist Statement
  • Eliejha: Propaganda Poster Project, Propaganda Poster Artist Statement
  • Jaden: Propaganda Poster Project, Propaganda Poster Artist Statement
  • Viviam: Self-Portrait Project, Self-Portrait Artist Statement
  • Sylena: Propaganda Poster Project, Propaganda Poster Artist Statement
  • John: Propaganda Poster Project, Propaganda Poster Artist Statement

Today we will:

  • Finish and post any missing assignments to our blogs

Missing Assignments + Extra Credit

missing-assignments-missing-assignments-every-whereCheck your folder for your progress report. It states what grade you will receive this marking period if you do nothing else during the remaining two classes.

This week, we will finish and post any missing assignments to our blog. We will then work on an extra credit option of our choice. You will only receive extra credit if you have completed all required projects!

Visual Art Open Studio Hours

If you do not finish your assignments by the end of Thursday’s class, you will need to attend Visual Art Open Studio Hours next week during the following time slots:

  • Monday, 1/22 – 7:30-10:30AM – Ms. Lawson’s room
  • Thursday, 1/25 – 7:30-10:30AM – Ms. Lawson’s room

Extra Credit Options

Newnimal

Use Photoshop to create a new animal. Use a minimum of 4 photos to build an image. Don’t forget about your background!
flying-cobrantula-newnimal.jpg

My new celebrity best friend

Use Photoshop to create at least 3 images of you and a celebrity or famous athlete of your choice that could be posted to Instagram or SnapChat to create the illusion that you are friends.

Stop Motion Animation

Download the Stikbot studio app on your phone. Follow these steps to create a smooth 10-15 second animation. (That is 100-150 photos!) Upload it to YouTube and post the link on your class blog.
taller-stop-motion-valencia-droide.jpg

Today we will:

  • Check the progress report in our folder
  • Finish any incomplete assignments (and post them to the blog according to the instructions)
  • Begin working on an extra credit project of our choice
  • You must make a blog post in order to receive participation points!

Propaganda Poster Final Blog Post Requirements

the-cat-diary.jpgToday many of us will finish our propaganda posters and make our final blog posts.
The blog post should include:

  • A PDF of our finished project
  • A PNG of our finished project
  • A 150 word artist statement about our project.
    Not sure what to write? Start by answering the following questions:

    • Describe your artwork
      • What does your artwork look like?
      • What is the subject matter?
      • What art elements or principles are most obvious in your work?
    • How did you create your art?
      • What media is your artwork made from?
      • Describe the process or steps you took to create your artwork.
    • What is the big idea behind your artwork?
      • Who or what inspired your artwork?
      • What is your artwork about?
      • How do you want people to feel when they view your artwork?
    • Overall thoughts
      • What did you learn from creating this artwork?
      • Is the final piece what you imagined? How so?
      • What did you do well? What could you have done better?

Today we will:

  • Finish our Propaganda Posters
  • upload both the Photoshop (.psd) and PNG files of our final projects to our Google Drive Folders
  • Create a new blog post with the following:
    • A PDF of our finished project
    • A PNG of our finished project
    • A 150 word artist statement about our project.

Featured Artist: Olly Moss

Today’s essential question: How has Olly Moss created simple, yet visually interesting posters?

The British artist Olly Moss does a great job creating simple, yet visually interesting vector movie posters. He also has represented copyrighted intellectual property in a way that uses all original artwork.

Here are some examples of Olly Moss’s work: