Photo Assignment #7: Black & White Lighting

Today’s essential question: How can I use natural light to take great photos?

Today we will take photos with great lighting during the first half of class. During the second half of class, we will convert our photos to black and white. We will post both the original color photos and the black and white version to our blogs today.

Here are some photos taken by SOTA students that make great use of lighting:

Photography Lighting Tips

  • Go outside. The sun is a more even, flattering source of light than anything you can find inside.
  • Avoid harsh sunlight. Cloudy days are better for taking photos, because the clouds diffuse the sunlight, softening both the light itself and the shadows it creates. For the same reasons, it is better to photograph in the morning or evening instead of high noon.
  • Diffuse harsh light with position and location. We can’t control the weather, but we can work around it. If the lighting is particular harsh, move your subject to a shady spot, such as under a tree or against a building. Check to make sure there aren’t any harsh shadows being cast. Also, try walking around your subject or having them face different directions. The lighting can dramatically change depending on the direction you face.
  • Hold still. If you are working with limited light, the shutter will remain open longer to properly light the photo. If you (or your subject) move during this time, the photo will be blurry.
  • Avoid flash. It will over-expose the light areas and under-expose the dark parts of your photo, and you won’t be able to correct it in Photoshop.
  • Shoot with the sun to your back or side. Shooting facing the sun will cause the same issues as your camera’s built in flash – it will over-expose the light areas and under-expose the dark parts of your photo, and you won’t be able to correct it in Photoshop.

How to convert your photos to black & white:

  1. Open Photoshop from the Start Menu at the bottom of the screen.
  2. Image -> Mode -> Gray scale
  3. Image -> Adjustments -> Levels
  4. Look at the image that pops up. If your image has sufficient contrast, the “mountain range” will extend to the edge of the window.
    If your image looks similar to this, you do not need to adjust the levels, and can close out of the window:

    levels_no_adjustment

    If your “mountain range” of values does not extend to the edges of the window (such as the example below), you will click on the left cursor and drag it to the beginning of the left side of the mountain.
    You will then click on the right cursor and drag it to the beginning of the right side of the mountain.
    You will be able to preview what you are doing as long as the “preview” box is checked.

    levels_before_and_after

    5. When you have adjusted your levels, click ok.

    6. Save the black and white version of your image. (File -> Save as.)
    Do not replace the color version, as you will need to post both to your blog!

Today we will:

  • Take photos with great lighting during the first half of class
  • Convert the photos to black and white
  • Create a new blog post with the following:
    • BOTH versions (black and white and color) of the photos you took today
    • A paragraph answering the following questions:
      • What did you learn about photography and lighting today?
      • What (if anything) will you change about the way you take photos in the future to ensure quality lighting?
      • Do you prefer your photos in black and white or color? Why?

Photo Assignment #6: Macro Photography

Macro photography is extreme close-up photography, usually of very small subjects, in which the size of the subject in the photograph is greater than life size.

Here are some examples of macro photographs:

Here are some macro photos taken by past SOTA students:

Today we will:

  • Take macro photos outside
  • Create a new blog post with the following:
    • the best 10 macro photos taken during today’s class (you should have taken a lot more than 10 photos!)
    • a few sentences describing what was easy about macro photography and what you found challenging

Photo Assignment #5: Rule of Thirds

Today’s essential question: How can I use the rule of thirds to take photos with a dynamic composition?

Today we will use the rule of thirds to improve the composition of our photos. You may take props with you if wish.

Rule of Thirds

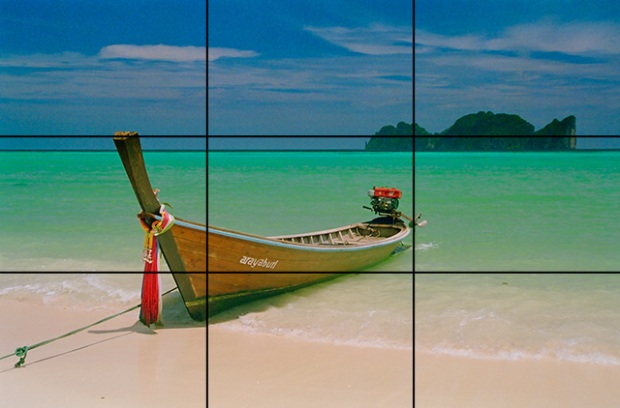
To apply the rule of thirds to your photograph, break an image down into thirds (both horizontally and vertically) so that you have 9 parts. Place points of interest in the intersections or along the lines to create a more balanced and visually interesting photo. Studies have shown that people’s eyes usually go to one of the intersection points rather than the center of the shot. When we use the rule of thirds, we make the way people naturally view images work for us rather than against us. kohphiphi-15 4286577129_2ecc78308d_z_1   rule-photography2

Avoid centering your focal point. See how the image below feels static and boring?

Placing your focal point a third of the way across the page will create a much more interesting image:

Notice how the artist has improved the photo by cropping it to follow the rule of thirds:

Today we will:

  • Take photos outside that follow the rule of thirds
  • Create a new blog post with the following:
    • the best 10-20 photos taken today
    • a few sentences describing how your photos follow the rule of thirds

Photo Mini Assignment #4: Photographing Line and Shape

Today’s essential question: How can I use the art elements line and shape to create interesting photographs?

Today we will take photos, trying to capture line, shape, and space in interesting ways. You must post your best photos from today to your blog AND write a reflection according to the instructions at the bottom of this blog post in order to receive participation points for the day.

Look for photo opportunities that already exist, but at the same time, be ready to stage photos if you get an idea that fits today’s assignment.

Line

Shape

Today we will:

  • Take interesting photos of line and shape
  • Create a new blog post with the following:
    • The best photos we took today
    • Label each photo with the appropriate category (line or shape)
    • The answers to the following questions
      • What are some ways your photography skills have improved over the past few classes?
      • What are some things you still struggle with?

Catch Up Day

cat-on-top-of-it

Today we will catch up on our missing assignments.

Bad Photos

You must take a photo that illustrates each of the following concepts: blurry, crooked, no clear subject matter, poor composition, cliche, awkward objects in the background, poorly exposed (poor lighting).

You will  then write a sentence describing which category the photo falls into and why.
Dax and Shaborn have great examples of what I am looking for.

You may take new photos for this assignment, but you must stay in the classroom to do so.

Emoji Project

You must post both PDFs and PNGs of your 4 finished emojis in one final blog post.
Check out Dax’s blog post if you need an example of what I am looking for.

Missing assignments list:

  • Dynasti – Bad Photos, Emojis
  • Nakei – Bad Photos, Emojis
  • Eysha – Bad Photos, Emojis
  • Nea – Bad Photos, Emojis
  • CJ – Emojis, Bad Photos (blog post was not properly formatted)
  • Lakeyia – Bad Photos, Emojis
  • Logan – Bad Photos, Emojis
  • Karen – Bad Photos, Emojis
  • Eh Tha – Bad Photos (blog post was not properly formatted)
  • Passion – Emojis
  • Carleton – Bad Photos, Emojis
  • Raul – Bad Photos, Emojis

Today we will:

  • complete any missing assignments
  • publish our missing work to our class blog


Photo Assignment #3: Photographing the Same Subject from Different Perspectives

Today’s essential question: How can I take at least 10, different, interesting photos of the same subject?

Today we will pick one subject and spend all class photographing that same subject from a variety of viewpoints, and in a variety of locations. Think about what story you are telling with each photo. Try different camera angles, and check to make sure there are no awkward objects in your background. At the end of class, we will post the best 10 photos to our blogs.

Here are some examples taken by previous 10th grade students:

Victoria
Mariana
McKenzie

Today we will:

  • Pick a subject and photograph only that subject from a variety of viewpoints
  • Create a new blog post with the following
    • The best 10 photos taken today to our blogs
    • A few sentences describing how easy or challenging it was to stick to photographing the same subject all class

Photo Assignment #2: Angle of View

Today’s essential question: How can pointing a camera up, down, or straight ahead change the overall mood of the photograph?

Today we will take interesting photographs from different camera angles.

Eye Level

An eyelevel angle is the one in which the camera is placed at the subject’s height. Eye level shots are incredibly common because they are neutral. They often have no dramatic power whatsoever. cat_eye_level   eye-level-great-white_shark

High Angle

In a high angle (bird’s eye view), the camera is above the subject, looking down. High angle shots can make the subject seem vulnerable or powerless, and are usually used to make the image more dramatic. high angle view of a young man dunking a basketball   high_angle_dog

Low Angle

Low angles (worm’s eye view) are captured from a camera placed below the subject, looking up at them. Low angles make the subject look dominant, aggressive, or ominous. dave-hill-dynamic-angles   ??????????????????????????????????????????????????????????????????????

Today we will:

  • Take photos outside from the following points of view: bird’s eye view, worm’s eye view, eye level view
  • Transfer the photos onto our computer and clear the memory card
  • Create a new blog post with the following:
    • The best 3-5 photos for each category (birds eye view, worms eye view, eye level) This means you should have 9-15 photos total.
    • Photos should be grouped by category and labeled. No credit will be given for photos that are not labeled with the appropriate camera angle.

No blog post = 0 participation for the day

Photo Mini Assignment #1: Bad Photos

Today’s essential question: What are some common photography mistakes that should be avoided in order to achieve professional quality photos?

Today we will complete a 1 Day Assignment: Bad Photos. You will upload one photo in each of the following topics to your blog at the end of class, along with a brief write up as to why each photo is objectively terrible.

Blurry Photo
robert_blurry_cropped
Images come out blurry for a few reasons when there is not enough light reaching the sensor or when the subject is moving too quickly. Solutions include adding adequate light, stabilizing the camera, or asking your subject to hold still for a moment.

Crooked Photo
slantedpeoplesbacks
Beginner photographers often think that slanting the camera will make their photograph appear “artsy.” It will not. It will just make it look like you were falling sideways while you took the photo.

Poorly Exposed Photo
poorly-exposed-photo
We can lighten or darken a photo in Photoshop, but if the image has too much contrast to begin with (usually caused by shooting directly into the light source, instead of having the light source at your back), there is no way to fix the photo.

Photo Without Clear Subject Matter
photo_no_subject

It is important to have a clear subject in your photo, as no amount of editing can turn a bad photo into a good one. A photo subject is anything that stands out in the photo, that makes it interesting and that the human eye will see first.

Your subject could be a person, a building, a tree or a mountain, but you have to have something that stands out, that the eye will see first. If nothing stands out, the photo is empty, and there is no point in taking it. It’s a common rookie mistake to take a photo of a sunset that has just the sky and the sea. Even if the sunset is really amazing, that photo won’t look good unless there’s a good subject in it.

Photo with Poor Composition
poor_composition1
In the photo on the left, the subject is too centered and makes the image feel boring. There is too much space at the top of the photo, and not enough space below. Notice how much more interesting the photo on the right is by changing up the composition. The eyes of the subjects in the photo on the right follow the rule of thirds.

Cliché Photo
cliche_feet_vacation
A cliché photo is one that contains an overused concept and reflects a lack of original thought.  Cliché photos are all over Instagram and SnapChat.

Awkward Objects in Background

Pay attention to how the different elements in your photo interact with one another. For example, if the tree in the background looks like it is growing out of your subject’s head, you can walk around the subject slightly so the tree is no longer directly behind them.

Today we will:

  • Learn how to use the cameras
  • Take objectively terrible photos so that we may learn how to avoid these bad habits in the future
  • Transfer the photos onto our computer and clear the memory card
  • Create a new blog post with the following:
    • One example of each of the following bad photo categories:
      • blurry photo
      • crooked photo
      • poorly exposed photo
      • photo without clear subject matter
      • photo with poor composition
      • cliché photo
      • photo with awkward objects in the background
    • One sentence per photo describing why each bad photo is bad

Remember, no blog post = 0 participation for the day.