You Guys are Awesome (and yes, we’re still doing work today)

trophy_kittenThere was an overwhelmingly positive response to your work and our Media program at the state conference. We have one of the strongest Media programs in the state thanks to your hard work.

Today we will brainstorm future project ideas and equipment requests. We will then continue creating our characters in Illustrator, making sure to separate the body parts on different layers.

Questions:

  • What types of work would you like to do more of?
  • Animation
  • Video
  • Interactive Design/App Design/Game Design/Augmented Reality
  • Digital Illustration (Illustrator & Photoshop & Procreate)
  • What type of equipment would you like to see us get?
  • What are some ways we can display time-based work in the shows?
  • Are you ok with experienced art teachers from other districts coming to visit us? What should be the guidelines?

Breaking our character into body parts that can be animated

Today’s essential question: How can I break my character into body parts I can animate?

Today we will finish sketching our character from both the front and side views, and will label the rotation points and how we plan to make our character move. Here are some examples of students who are ready to build their character in Illustrator:

Once Ms. Lawson has approved your sketches, you can begin building your character in Illustrator. You will need to trace each body part as a separate shape, and certain body parts may need to be broken into several shapes that overlap, as in the example below. Why is it important to have overlapping separate shapes?


Today we will:

  • Finish our character sketches and label any rotation points and planned movements
  • Trace over our character sketches in Illustrator, tracing each moveable part as a separate shape
  • Create a new blog post with an image of the work we created today

New Project: Animated Character GIF

Today’s essential question: How can I created a looping GIF of an original animated character in Adobe Animate?

Here are some examples of animated GIFs that would fulfill project requirements:

Project Requirements:

  • TWO animations of the same character (front view and side view)
  • Original character created by YOU in Illustrator and animated in Animate  (no copyrighted characters!)
  • Each animation contains at least 3 moving body parts
  • Animation brings character’s personality to life
  • Smooth, realistic animation created in Adobe Animate incorporates:
    • tweens
    • easing
    • squash & stretch
    • minimum of 60 frames

Here is an example of what I am looking for in today’s sketch.
Remember to draw BOTH the front and side views of your character and label each rotation point and how that body part will move:

bird_sketch.jpg
bird_sketch_side_view.jpg

Today we will:

  • Introduce the animated character project
  • Sketch potential character designs from both the front and side views, including notes on how the character will move
  • Add color to our character with Sharpie
  • Post a photo of our character sketch to our blogs

Animation Tutorials Day 3: More Rotation Points

Today’s essential question: How can I design a character with moving body parts in Animate?

blue_bird.gif

Today we will animate a bird to review what we learned about rotation points last class. Start by downloading the “bird animation” folder Ms. Lawson has shared with you in Google Drive. You may animate any color bird you like, and you get to design how your bird behaves.

Things to remember (follow these steps in order to prevent a stressful weird animation):

  • Create a new Animate Document that is 900px wide by 800px tall
  • Import the bird.psd of your choice. Convert all graphics to symbols when you import the bird.psd file.
  • Put each body part on a separate layer layers.
    You can use folders folder to organize your layers:
    folder_organization
  • THEN use the transform tool rotation_point_end 
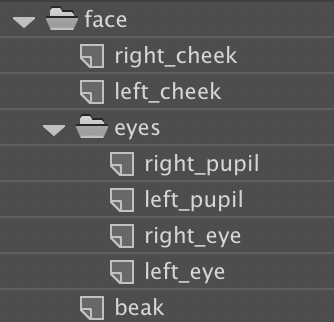
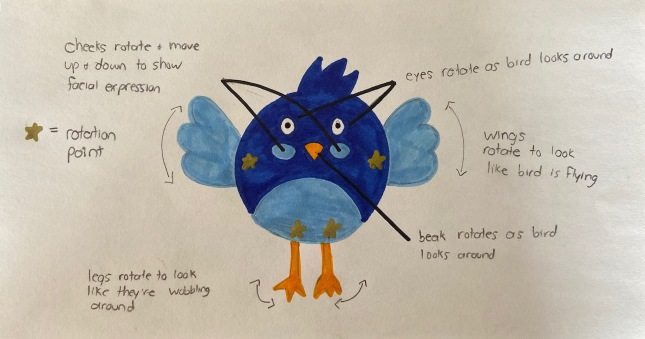
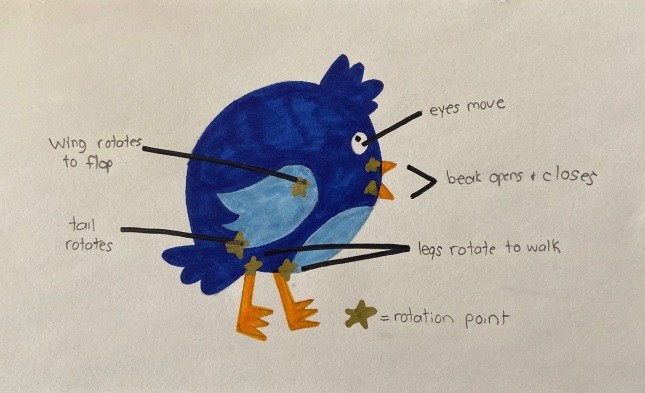
to move all rotation points to the correct locations
  • THEN set key frames keyframes in the spots in the timeline where you want your action to change
  • THEN use the transform tool rotation_point_end to rotate or move body parts at various keyframes keyframes
  • THEN add tweens tweens
  • THEN add eases
  • Save your animation as a .fla file
  • Export your animation as a GIF

Today we will:

  • Animate a bird to review what we learned about rotation points last class
  • Upload both the Animate and gif files to the animation folders in our school Google Drive accounts, and make sure we have shared the folder with Ms. Lawson
  • Create a new blog post with the following:
    • gif of completed Bird Animation
    • a few sentences on our blog summarizing any challenges you faced today, how you worked through those challenges, and how you currently feel about computer animation.
  • Finish any missing/incomplete animation tutorials (bouncing ball and cat) and post them to your blog

Animation Tutorials Day 2: Rotation Points

Today’s essential question: How can I use the transform tool and rotation points to animate a moving character in Adobe Animate? 

Today we will complete the Cat Rotation tutorial. Then we will finish any missing/incomplete animation tutorials from last week.

Cat Rotation Tutorial

This tutorial will teach you how to set anchor points and how to rotate objects around those anchor points. You will need to sign into your school Google Drive account, open the Animation folder I have shared with you, and download the “black_cat.psd” file. Do not try to save the image from this blog post, as it will not have the body parts on separate layers like PSD file in Google Drive does.


Today we will:

  • Complete Cat Rotation tutorial, upload both the Animate and gif files to the animation folders in our school Google Drive accounts, and make sure we have shared the folder with Ms. Lawson
  • Create a new blog post with the following:
    • gif of completed Cat Rotation Animation
    • a few sentences on our blog summarizing any challenges you faced today, how you worked through those challenges, and how you currently feel about computer animation.
  • Finish any missing/incomplete assignments post them to your blog

Animation Tutorials Day 1: Bouncing Ball

Today’s essential questions: How can I use the principles of animation to animate a bouncing ball in Adobe Animate? 

Today we will begin our animation unit by animating a bouncing ball in Adobe Animate.

Bouncing Ball Tutorial


Open Adobe Animate on your computer.
Then follow the steps in this handout to animate a bouncing ball! (Note: The tutorial was written for an older version of Animate. If you notice any issues, please let Ms. Lawson know.)

Uploading an Animation to YouTube

You will need to save all your Animate files and upload them to your Google Drive (this will also allow you to open up the file and make changes at a later date if needed), but you will not be able to post this file format to YouTube. Therefore, you must also export an MOV of each tutorial and post that to YouTube in order to receive credit. Here is how you can export an MOV file from Flash:

  1. Click File -> Export -> Export Movie
    file_export
  2. Select Quicktime from the drop down menu, name your file with your name, and press export
    export_window
  3. Upload the MOV to YouTube and link it in today’s blog post

Missing/Incomplete Assignments

  • Boone – add PDF file to finished landscape blog post
  • Ashanti – final landscape blog post with: PDF, PNG, and 150 word artist statement
  • Amber – final landscape blog post with: PDF, PNG, and 150 word artist statement, final t-shirt blog post with: PDF, PNG, and 150 word artist statement
  • Treasure – final landscape blog post with: PDF, PNG, and 150 word artist statement
  • Anastacia – final landscape blog post with: PDF, PNG, and 150 word artist statement
  • Maria – final landscape blog post with: PDF, PNG, and 150 word artist statement; final t-shirt blog post with: PDF, PNG, and 150 word artist statement
  • Gianna – final landscape blog post with: PDF, PNG, and 150 word artist statement; final t-shirt blog post with: PDF, PNG, and 150 word artist statement
  • Poe – final landscape blog post with: PDF, PNG, and 150 word artist statement; final t-shirt blog post with: PDF, PNG, and 150 word artist statement
  • Han – final landscape blog post with: PDF, PNG, and 150 word artist statement; final t-shirt blog post with: PDF, PNG, and 150 word artist statement

Today we will:

  • Complete the Bouncing Ball tutorial
  • Upload the Animation to YouTube
  • Create a New Blog Post with the Following
    • the link to the Finished Bouncing Ball Animation on YouTube (you cannot directly upload the file to your blog)
    • A few sentences describing any challenges you faced and how you worked through those challenges
  • Finish and post any missing/incomplete assignments to your blog