
Day 2: Melt
Day 1: Growth
The Great Quarantine Art Adventure
Today’s essential question: How can I continue to make art at home and connect with fellow artists?

OUR ADVENTURE: Each day, we will provide a simple word to use as inspiration for you to create a piece of art during your quarantine. Your creation can be: a sketch, sculpture, photograph – the possibilities are endless. Use any material you have available like traditional art materials, Legos, the contents of your recycling bin, all that unused toilet paper you’ve been stockpiling… you get the idea. Work alone or with anyone from whom you have not been forced to socially distance yourself. Share your adventure with everyone you know, and encourage them to join in the fun.
OUR GUIDELINES: Open-ended and engaging prompts that are simple and accessible to all. Prompts can be interpreted in any way by anyone. When you post to social media, use the hashtag #TGQAA and tag us! We will be reposting as many creations as we have the ability to post throughout each day.
OUR MISSION: Creating connections and inspiration through daily art challenges.
OUR TEAM: Art educators interested in starting and stoking a visual conversation.
Click here for daily prompts, and make sure you post to your class blogs as well as use the hashtag #TGQAA on social media.
New Project: Vector T-shirt Design
Today’s essential question: How can I use the pen tool to create an attractive vector t-shirt design in Adobe Illustrator?
For our next project, we will create a vector t-shirt design in Adobe Illustrator.
Today we will sketch our t-shirt design on a piece of paper. We will then use Sharpies to color our design with solid areas of color. You can use as many colors as you think your design needs, but you cannot shade or blend any colors. You will then post a photo of your colored sketch to your class blog. You must post a photo of your sketch to receive participation points for today, even if you have not finished your design. Next class, we will begin vectorizing our design in Adobe Illustrator.
T-Shirt Design Project Requirements:
- Your original concept. No copyrighted characters.
- Balance of positive and negative space


- Variety of line weight

- Sketch colored in Sharpie (solid color with no shading), then vectorized in Illustrator
- Design does not run off edges of paper
- No copyrighted characters

Here are some examples created by students in past years:

Liam, 12th Grade

Mckenzie, 10th Grade

Lauryl, 12th Grade

Chanet, 10th Grade

Taylor, Grade 9

Giacomo, 11th Grade

Ler Tha, 10th Grade
Today we will:
- Sketch our t-shirt design on a piece of paper
- Color in our t-shirt design with Sharpie
- Tape our t-shirt design to a wall, and take a photo of the design
- Post the photo of our t-shirt design to our class blog
More Animation Tutorials: Motion Path & Ghost Dog
Today’s essential question: How can I make an object follow a custom motion path? How can I use alpha channels to create fade effects when animating in Adobe Flash?

The bouncing ball tutorial taught us how animate an object that moves from one point to another.
Sometimes you may want an object to follow a more elaborate path of motion, such as a race car following a track, or a butterfly fluttering around a screen. In these cases, you would draw a line called a custom motion path for your object to follow.
Tutorial 1: How to Create a Custom Motion Path in Adobe Animate
Part 1: Setting Up the File & Layers
- Create a new Animate Document in Actionscript 3.0
- Save the butterfly PNG below. (Or download an image of your choice with a transparent background.)

- Import the picture of the butterfly.
File ->Import-> Import to Library->small__blue_butterfly.png - Go to the timeline at the bottom of the screen.
Double-click “Layer 1” and rename it “butterfly.” - Click on the Libraries panel.
Select “small__blue_butterfly.png” and drag it onto the stage. - Right click (or control + click) on the butterfly image -> convert to symbol -> convert to movie clip.
Name the movie clip “butterfly.”
Part 2: Creating the Motion Path
- Create another new layer on the Timeline, select the Pencil tool in the Tools panel,
and select a stroke color from the Property inspector on the right. - Draw a path on the stage with the Pencil tool.

- Switch to the Selection tool
 and double-click the path you just created.

- Choose Edit→Cut to remove the path from the stage temporarily.

- Right-click (Windows) or Control-click (Mac) Frame 1 of the layer that contains your symbol and choose Create Motion Tween from the contextual menu that appears.

- A new tween span is created for your triangle symbol.

- Choose Edit→Paste in Place to paste the path you created earlier.

- Flash automatically converts the path to a motion path, and your symbol snaps to the path.

- Press Enter or Return to play your movie. The symbol follows the path you created.
Tutorial 2: Ghost Dog Transparency: How to Fade an Object or Color Using Alpha Channels
Complete the Ghost Dog Transparency tutorial. Save the image of the ghost dog from this blog post, or download your own image with a transparent background to use.
Today we will:
- Complete our character animations. Post a GIF of our completed animation, and a 150 word artist statement about the animation to our blogs
- Complete both the Motion Path and Ghost Dog Tutorials and post them to our blogs
- Upload both the Animate and GIF files to the Google Drive folder you have shared with Ms. Lawson
Animation Helpful Hints
Today’s essential question: What are some ways I can simplify the animation process?

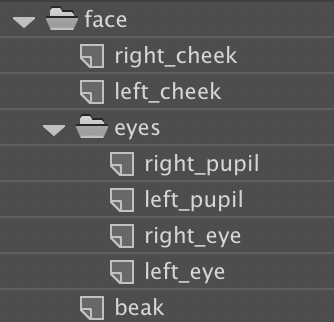
Today we will continue animating our characters. You may find it helpful to sketch out the timeline (with layers for each body part) like the image above.
Things to remember (follow these steps in order to prevent a stressful weird animation):
- Create a new Animate Document that has the same dimensions as your character.
- Import the .ai file of your character that you created in Illustrator. Convert all graphics to symbols when you import the .ai file.
- Put each body part on a separate layer
 .
.
You can use folders to organize your layers:
- THEN use the transform tool
 to move all rotation points to the correct locations
 before
 after
after - THEN set key frames
 in the spots in the timeline where you want your action to change
 - THEN use the transform tool to rotate or move body parts at various keyframes
 before
 after
after - THEN add tweens

- THEN add eases
- Save your animation as a .fla file
- Export your animation as a GIF
Today we will:
- Continue working on our character animation
- Upload both the Animate and gif files to the animation folders in our school Google Drive accounts, and make sure we have shared the folder with Ms. Lawson
- Create a new blog post with the following:
- gif of the animation (if you have not finished it, post what you have)
- a few sentences on our blog summarizing any challenges you faced today, how you worked through those challenges, and how you currently feel about computer animation.
Bringing Our Character into Animate
Today’s essential question: How can I bring the character I created in Illustrator into Animate?
How to Bring the Character You Created in Illustrator into Animate:
- Open the PDF of your finished character in Illustrator

- Save your file as an Illustrator (.ai) file.
(File -> Save As -> Illustrator (ai))

- Open Adobe Animate

- Create a new file the same dimensions as the Illustrator file of your character
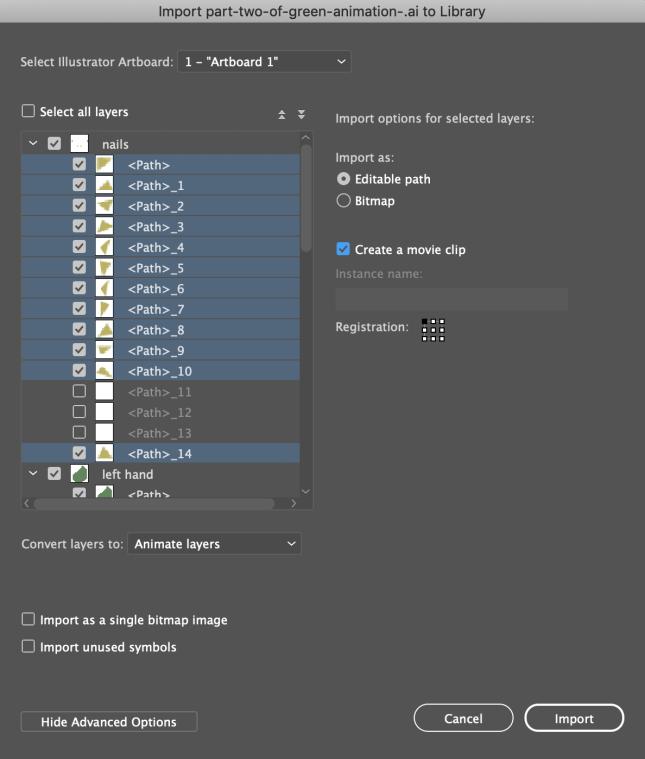
- Import the Illustrator (ai) file of the character that you just saved
(File -> Import -> Import to Library)

Select the Illustrator (.ai) file - Hold down the shift key to select all the layers you want to import. Then check the box to make sure each layer gets converted to its own movie clip. (This will save you tons of time so you don’t have to convert body parts individually later on. If you want to quickly import all layers, you can check the “Select All Layers” box at the top left.)
- Drag your body parts onto the stage, making sure each body part is on its own layer. Name your layers!
- Use the transform tool to adjust rotation points BEFORE setting any key frames or animating anything.
- Save your Animate file regularly to avoid losing any work.
Today we will:
- Finish tracing over our character sketches in Illustrator, tracing each moveable part as a separate shape
- Bring our character into Animate and prepare our Animate file so we can animate the character next class.
- Create a new blog post with an image of the work we created today. (If you are working in Animate, you can post screen shots of your library & timeline.)
Breaking our character into body parts that can be animated
Today’s essential question: How can I break my character into body parts I can animate?
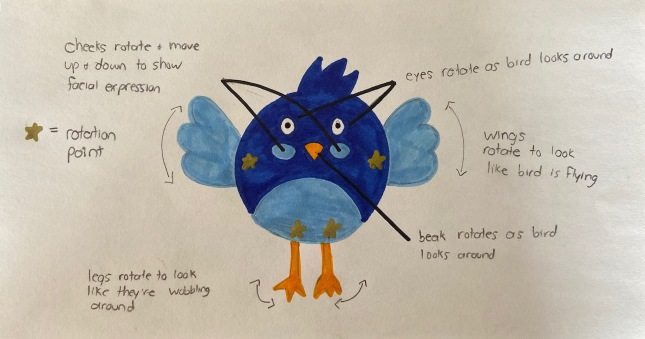
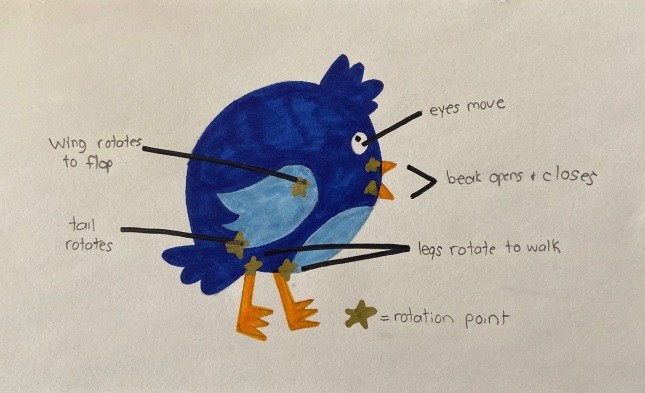
Today we will finish sketching our character from both the front and side views, and will label the rotation points and how we plan to make our character move. Here are some examples of students who are ready to build their character in Illustrator:
-

- Credit: Anastacia
-

- Credit: Tianna
-

- Credit: Troy
Once Ms. Lawson has approved your sketches, you can begin building your character in Illustrator. You will need to trace each body part as a separate shape, and certain body parts may need to be broken into several shapes that overlap, as in the example below. Why is it important to have overlapping separate shapes?

Credit: Boone

Today we will:
- Finish our character sketches and label any rotation points and planned movements
- Trace over our character sketches in Illustrator, tracing each moveable part as a separate shape
- Create a new blog post with an image of the work we created today
New Project: Animated Character GIF
Today’s essential question: How can I created a looping GIF of an original animated character in Adobe Animate?
Here are some examples of animated GIFs that would fulfill project requirements:
-

- Credit: Olecia
-

- Credit: Madeline
-

- Credit: Sydney
-

- Credit: Sophia
-

- Credit: Josh
-

- Credit: Norah
-

- Credit: Tianna
-

- Credit: Dariel
-

- Credit: Julian
-

- Credit: Janaya
-

- Credit: Oliver
Project Requirements:
- Original character created by YOU in Illustrator and animated in Animate (no copyrighted characters!)
- Contains at least 3 moving body parts
- Animation brings character’s personality to life
- Animation loops seamlessly (first frame is the same as the last frame)
- Smooth, realistic animation created in Adobe Animate incorporates:
- tweens
- easing
- squash & stretch
- minimum of 60 frames
Here is an example of what I am looking for in today’s sketch.
Remember to draw two different views of your character and label each rotation point and how that body part will move:
Today we will:
- Introduce the animated character project
- Sketch potential character designs from two different viewpoints, including notes on how the character will move
- Add color to our character with Sharpie
- Post a photo of our character sketch to our blogs
