Today we will use the Photoshop skills we learned yesterday to create a digital collage that represents us.
We will print this collage and use it as a reference when creating our black ink drawing.

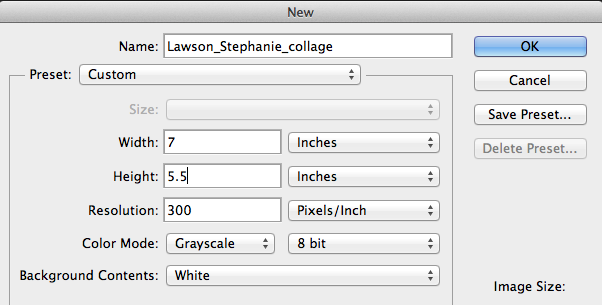
Ms. Lawson’s collage
Collage requirements:
- contains at least 4 images
- contains overlap
- images are a variety of sizes
- balanced composition that displays unity
- black & white
- represents the artist
Part 1: Downloading images to use
- Open a browser and go to images.google.com
- Type in what you are looking for. You may need to adjust the search terms. For example, “cute kitten” will yield better results than “picture of a kitten being cute.”
- Click on “search tools,” and select “large.” This will make sure that your picture will print clearly and not blurry.

- To download an image, click on the image, then click “view image,” then right click “save image as.”
Tip 1: Do not drag the thumbnail to your desk top or you will wind up with a tiny, useless image.
Tip 2: Remember where you saved your image or you will not be able to find it later! - Repeat steps 1-4 until you have downloaded at least 6 images.

Part 2: Creating a collage in Photoshop
- Open Photoshop.
- File -> New
- Set your file up according to the instructions below (use your name instead of mine!)
- Open your first image. In the layers palette at the bottom right of the screen, double-click on the background layer so your can rename it something other than background.
- Use a tool of your choice to remove the background.
Forgot how to remove backgrounds in Photoshop? Review the instructions from yesterday’s veggie tutorial. - File -> save. This will save the picture as a Photoshop file.
- Click on the icon with two small squares in the top right corner of the screen. This will allow you to see all the images you currently have open.
- Select the move tool in the toolbar on the left side of the screen.

- Click and drag the image into the main window. It should turn black & white.
- In the layers palette at the bottom right of the screen, double click on the layer name and name it something identifiable.
- File -> Save
- Repeat steps 4-11 until you have all the images in your collage file.
Tip 1: To make an image look like it is on top of another image, that layer should be on top of the other layer.
Tip 2: To make an object smaller, larger, or to rotate it, Edit -> Free Transform at the top of the screen. - File -> Save
- Save your image as a .jpg File -> Save as -> .jpg.


Part 3: Creating your Blog Post
- Post the jpg of your collage
- Post all the images you originally downloaded
- Write whether you are finished with your collage and would like me to print it, or if you are still working on it, what you plan to do next class to finish it
Need help? Please follow the following process:
- Check the blog
- Ask two classmates
- Still stuck? Raise your hand and Ms. Lawson will help you as soon as she is available.
Exception: If you do not have the class blog open and cannot tell me what step you need help with, I will not help you.
Today we will:
- Download at least 10 images that we may use in our collage
- Create our collage in Photoshop
- Save our collage as both a Photoshop file (.psd) and a JPG (.jpg)
- Create a new blog post with the following:
- the original images you downloaded from the internet
- a jpg of your collage image
- write whether you are finished with your collage and would like me to print it, or if you are still working on it, what you plan to do next class to finish it
